Bosque Del
Apache NWR, NM NOV 23-25 & NOV 29-DEC 1, 2003.
3-DAY IPTs: $829 (Limit: 12)
TENS OF THOUSANDS OF GEESE AND TEN THOUSAND SANDHILL CRANES, LOW
MOUNTAIN SCENERY, SPECTACULAR LIGHT, AND, IF YOU ARE IN THE
LEAST BIT LUCKY, SUNRISES AND SUNSETS THAT WILL BRING TEARS TO
YOUR EYES. THE PREMIER TEACHING
LABORATORY FOR THOSE WISHING TO DEVELOP THEIR CREATIVE VISION.
(AT PRESENT, I HAVE SCHEDULED ONLY TWO BOSQUE IPTs THIS YEAR, SO
IT WILL BE BEST TO REGISTER EARLY.)
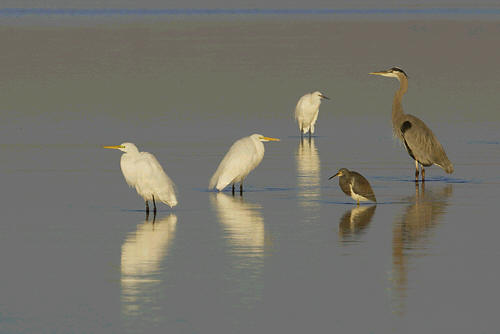
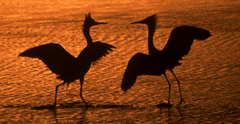
Group of Five, Little Estero Lagoon
Digital capture: EOS 1D, 600mm f/4L IS lens
ISO 250 Evaluative Metering -1/3 stop: 1/400
at f/16
Image copyright 2003 Arthur Morris/BIRDS AS
ART
In my almost
twenty years of photographing birds, I have never encountered a
more perfect grouping of birds than this. The birds, engaged in
a mini-feeding spree, held this joint pose only long enough for
me to stop down to f/16 and make one frame...Exposure with film
would have been at "0" because of the soft light and grayish
(rather than dark blue) water. Pictured are one great blue, two
Great Egrets, a Tricolored Heron, and a white phase Reddish
Egret.
MORE IPT
KUDOS
Adaoted
from an e-mail from post- X-mas SW FL-IPT participant Harold
Kerns:
"Sorry
for being late with this thank you note, but since returning
from Florida my schedule has been diverted, turned upside down,
etc. Hopefully I am back on track now. I learned a great deal
about bird photography and about the various methods and
techniques that need to be mastered. I know that my future
photos will reflect improvement in various aspects of picture
making. You took additional time and made a special effort to
aid me in learning the art of bird photography. Your IPT
provided me with a fantastic learning experience in wildlife
photography. Each and every moment of the three day session you
gave special care to ensure that all of our questions were
answered and that help was provided as needed. Thank You!"
My blood
pressure rises, my pulse quickens, and my muscles tense.
Someone toting an expensive super-telephoto lens has just shown
up at the Venice Rookery at 11 a.m. on a bright sunny day… Why
do I get so upset? In most cases, it is just about impossible
to make great bird photographs in bright sunshine during midday
hours. In these conditions, the warm red and yellow components
of sunlight are filtered out while the cool blue components
predominate. Shadows are sharp and harsh, and contrast is
increased to unpleasant levels. Seeing and understanding the
qualities of natural light will help all outdoor photographers
learn to use that light to make better images.
As a nature
photographer who makes a living photographing birds, being a
morning person is a huge advantage. I have no problem waking
early (heck—often too early) and being afield well before
sunrise. In early morning and late afternoon, the sun’s rays
need to travel through longer stretches of atmosphere before
reaching the earth. The cooler blue components of light are
filtered out, while the warmer reds and yellows predominate.
When we photograph, we are photographing the light reflected
from our scenes and subjects. If the light is warm and rich,
our subjects will exhibit warm and rich colors.
On foggy
mornings, the light can exhibit spectacular qualities when the
sun first breaks through; don’t give up too early when you are
socked in… Working with this soft light is like working under a
huge natural diffuser; colors are intensified and contrast is
greatly reduced. A lingering haze present after the fog has
burned off often makes it possible to continue making pleasing
photographs well into the midday hours.
Not only is the
quality of the natural light important, but the direction of
that light is important as well--equally important in my mind.
It is my strong preference to have my shadow pointing at, or
nearly at, my subject when photographing birds (and most other
natural history subjects as well). While many image-makers will
consider this advice heretical, side lighting simply does not
work for me with birds. I would rather miss a great action
photograph completely than attempt to make it from a spot where
my shadow would be pointing 30 or 45 or more degrees away from
my subject. Whenever possible, I will move left or right (to
attain a better sun angle) as quickly as I can before attempting
to make the photograph.
Why do I strive
to point my shadow at avian subjects? For me, direct frontal
lighting best illuminates a bird’s feathers. When you make
images “off-angle” to the light, a shadow cast by some part of
the bird will be cast onto the bird itself. When working with
color transparency film or with digital, we need to expose for
the highlights, that is, to choose an exposure that maintains
detail in the lightest, brightest areas of the frame. By
necessity, then--when using sidelight--the details in the
shadowed areas will be lost (unless you are working in a
low-contrast situation). In addition, I almost always find the
shadows themselves somewhat distracting. Side lighting may be
great for furry mammals or tasseled grasses, but I prefer my
birds fully lit by direct frontal lighting.
At times, the
meaning of “Point your shadow at the subject” confuses some
folks. Here is how you do it: With the sun somewhere behind
you, look at the ground in front of you and see where your
shadow is pointed. Now look up at your subject. If your
shadow-line is pointing to the left of your subject, you will
need to pick up your tripod and move to the right. If your
shadow-line is pointed to the right of the subject, move to your
left. When your shadow-line is pointed right at the subject,
you will be employing direct frontal lighting. Over time, this
procedure will become second nature.
In very early
morning or late afternoon, you do not, of course, want your
shadow to fall on the subject or even to appear in the image at
all. On occasion, you will, therefore, need to work a bit off
angle to the light. Options include taking a lower stance or
moving back and adding a tele-converter. There are other
situations when I choose to work off-angle to the light, but
almost never by more than 15 degrees. I do this most often to
ensure that the bird is parallel to the film plane. If my
shadow is pointed directly at the subject, but the bird is
angled to the film plane, I will move left or right so that the
subject better parallels the film plane.
While I pretty
much detest side lighting for my bird photography, I find back
lighting much more pleasing. To achieve the strongest backlit
effect, position yourself so that you, your subject, and the sun
are on the same line. In general, you will wish to work against
dark or middle-toned backgrounds. Positioning a backlit subject
against a clear sky will usually not work out too well. Working
with white birds like gulls and terns when using backlighting
will allow you to produce a striking rim lit effect; the white
feathers along the edge of the subject’s body will glow bright
silver (or gold if the sun is near the horizon). Rim lighting
is most effective when combined with dark or black backgrounds.
(In these situations, you will usually need to subtract a bit of
light from the exposure suggested by your camera’s evaluative
meter to prevent overexposing the rim-lit features.)
When strong
backlighting is combined with subjects positioned against light
or middle-toned backgrounds, it is often possible to produce
images with the subject or subjects rendered as jet-black
silhouettes. Positioning yourself so that you are on the same
line as the subject and your light source will produce the most
dramatic silhouettes. Brightly colored sections of sky at
sunrise or sunset (or their watery reflections) make for
stunning backdrops. Rise early and quit late; the most intense
colors in the sky often occur as early as an hour before sunrise
or as late as an hour after sunset.
Early on in my
photography career, I would opt to stay home if a clear day were
not in the forecast, reasoning that the quality of light would
be too poor for photography. I could not have been more wrong.
Over the years, I was often forced into the field on cloudy days
while leading my BIRDS AS ART/Instructional Photo-Tours. I soon
discovered that cloudy, overcast, or—best of all—cloudy-bright
days were ideal for nature photography (especially for macro or
close-up work). The soft light creates reduced contrast, there
are no shadows to worry about, and colors are richly saturated.
Underexposure is often a problem on dreary days, so be sure to
add a bit of light across the board to your exposures. In
addition, the light tends to be bluish in overcast conditions or
when working with shadowed subjects. Use fill flash to restore
the film’s color balance, add sparkle to the bird’s feathers,
and put a highlight in its eye. (It is best to use a flash arm
to prevent red-eye or steel-eye in birds.) Another option for
restoring color balance is to warm things up with an 81B
filter. (Unfortunately, finding a drop-in filter for your
super-telephoto lens is often a difficult chore).
On many cloudy
days, it is often possible to detect a hint of the sun’s
presence. At these times, I will still strive to point my
shadow at the subject as if the sun were shining. On
cloudy-bright days, doing so is a necessity. Another wonderful
thing about working in cloudy conditions is that you can make
great images all day long. There is no pressing need to take a
break in the middle of the day as there is on bright sunny days
when harsh light rules the roost from about 10 a.m. till 3 p.m.
or so.
To use the
light fantastic, get to bed early, set your alarm clock for well
before dawn, nap during midday hours when the light is harsh,
and stay afield until the last reddish glow on the western
horizon has faded. Become skilled at making pleasing images on
dreary days. And most importantly, learn to see, to understand,
and to use natural light to help you create dramatic images of
birds and other natural history subjects.
For those who
wish to photograph all day long on clear sunny days, I offer the
following advice:
- Find
birds that are in the shade and use fill flash.
- If the
opportunity presents itself, concentrate on flight
photography.
- Choose
extremely long focal lengths. When working with attractive
avian subjects and harsh light, working tight will often
produce pleasing images.
- Consider
doing macro photography and using a diffuser or a diffusion
tent. In a pinch, casting your own shadow on a subject can
yield pleasing results.
The Venice Rookery is located in South Venice
on Florida’s west coast about an hour north of Ft. Myers. For
more than a decade it has been a Mecca for nature photographers
from around the world who come to photograph the nesting Great
Blue Herons and Great Egrets. The eye-level nests, most of
which are about 100 feet away, are built on a small island in a
relatively small pond. The rookery is best photographed in
early morning light on clear days, and then again at sunset. The
best times to visit are from winter to early spring. To reach
the rookery exit Interstate 75 at Jacaranda Boulevard. Travel
south on Jacaranda for about five miles until you reach Highway
41. Turn right and then left almost immediately
at the Highway Patrol station. The rookery island will appear
almost magically on your right in about 400 yards. Be sure to
park on the left side of the road. And don’t be late…
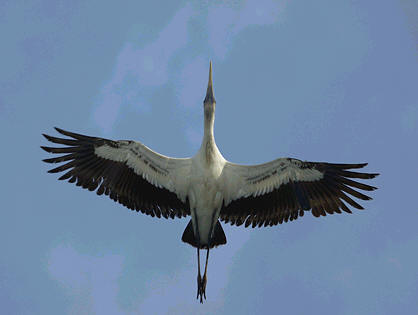
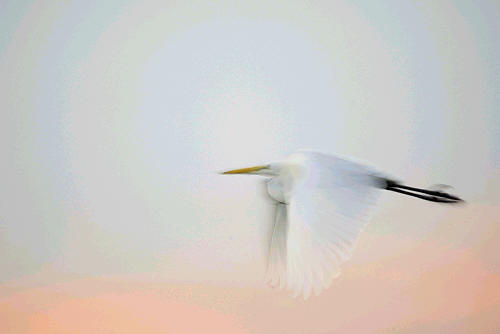
Great Egret predawn flight, Venice
Rookery
Digital capture: EOS 1D,
handheld 100-400mm IS L lens at 400 mm.
ISO 250,
Evaluative Metering +1 1/3 stop (set manually): 1/15 sec. at
f/5.6. Fill flash at -1 stop with Better Beamer and Arca-Swiss
Wimberley Flash Bracket.
Image copyright 2003
Arthur Morris/BIRDS AS ART
There is simply no substitute for
getting up early and being in position in the predawn light.
Going digital has given me the opportunity to experiment and
push the creative envelope to new heights. It is not that you
cannot make these images with film, but that with digital it
is easier to experiment as you can do so virtually without
expense and make corrections on the next frame after viewing
the histogram.