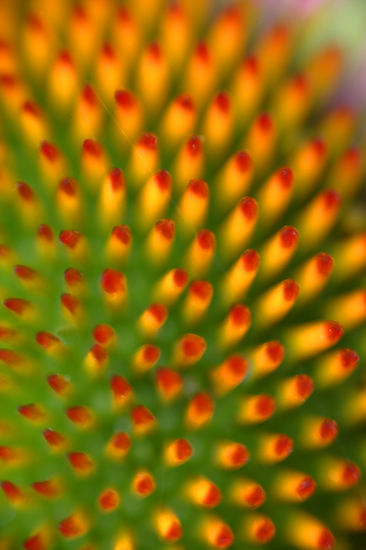
CHICAGO TRIP REPORTCHICAGO THANK YOU NOTEPLAMPSA PRIMER ON COLOR TEMPERATURES FROM ELLEN ANONPurple Coneflower, Peck's Farm, Chicago, ILDigital capture with Canon EOS 1Ds, 180mm macro lens, 1.4X II teleconverter, & 62mm of extension. ISO 50. Evaluative Metering -1/3 stop: 1/13 sec. at f/5.0. Macro Twin Light +2/3 stop. Manual focus. Cable Release, Plamp. Unless noted otherwise, all images with Linhoff Prophy II Ballhead and Gitzo 1325 Carbon Fiber Tripod.
Image copyright 2003 Arthur Morris/BIRDS AS ART
Seeing the histogram allowed me to come up with the correct setting for the flash, one that I would never have imagined would have been correct. I was captivated by the colors and patterns of the coneflowers.
CHICAGO TRIP REPORT
The Chicago Seminar and the entire Photo Weekend was a huge success. We had 72 folks on Saturday and I venture to say that everyone went home happy and educated. I got in two days early and scouted the two spots that we had selected for the In-The-Field Workshops (Peck's Farm and Baker Lake) and were thrilled to note that the purple coneflowers were blooming. I really fell in love with those colorful blossoms and did most of my work with the 180 macro and the Macro Twin Light that provides incredibly soft light.
As this flash tends to underexpose slightly, using my digital 1Ds was a tremendous help since I was able to check my exposures on the spot and dial in the correct compensation. I often used the 1.4X II teleconverter along with one or more extension tubes to make extreme pattern images. While we spent most of our time afield with the flowers, we did have some good chances on female Red-winged Blackbirds carrying food for young.
I would like to thank both Todd Gustafson and Dawn Douglas for their help, especially on Saturday when each of them worked amazingly hard to ensure that things came off smoothly.
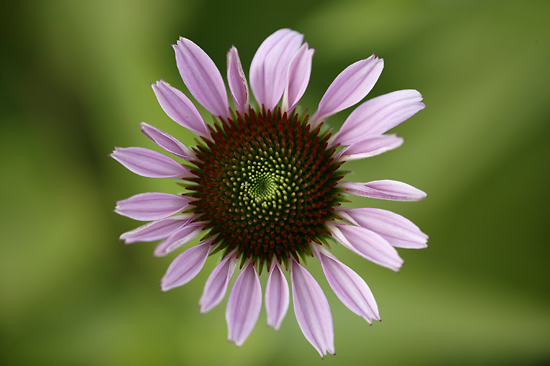
Purple Coneflower, Peck's Farm, Chicago, ILDigital capture with Canon EOS 1Ds & 180mm macro lens. ISO 400. Evaluative metering at zero: 1/800 sec. at f/3.5. AI Servo AF.
Image copyright 2003 Arthur Morris/BIRDS AS ART
On a breezy morning with all the Plamps in use, I went to handholding the 180 macro lens and looking straight down at the flowers. I shaded the blossoms with my body to reduce contrast and chose a higher ISO than usual so that I'd have a fast shutter speed that would enable me to make sharp images while handholding.
CHICAGO THANK YOU NOTEI received the following e-mail from Chicago participant Bruce Boswell <smile>:
Artie, I just wanted to compliment the great opportunity that you provided in Chicago.
1) Few photographers provide opportunities in the Midwest as the area is not exactly nature photography Mecca!
2) Both days (Saturday and Sunday) were very good. I have attended many one-day seminars and your presentation was equal to any I have seen before because you provided excellent information while being absolutely candid....
3) Your 'in-the-field' style was absolutely perfect with you being constantly available for us while helping out anyone who requested assistance and providing numerous 'mini- lessons all the while. I truly liked the idea that you shot with us and then took the time to explain the nuances of your selections...
4) Providing lunch and using that time to talk photography was great...
5) Having Todd and Beth--the Canon rep, on the ITF-Workshops was great.
6) I am struggling with your "no spot meter exposure" (I was converted to spot metering by John Gerlach and George Lepp years ago.....) but I certainly see the rationale for your preference for using Evaluative Metering and am trying to learn to evaluate scenes as you do.
Thanks! I hope to shoot with you again.
Bruce
wildflower, Baker Lake, Chicago, ILDigital capture with Canon EOS 1Ds &180mm macro lens, . ISO 250. Evaluative metering -1/3 stop: 1/4 sec. at f/32. Mirror lock-up and cable release with Plamp.
Image copyright 2003 Arthur Morris/BIRDS AS ART
This image looked lousy wide open, but going to f/32 with mirror lock, cable release, and Plamp allowed for the sharpness that make this one pop. I took great care to ensure that the green plastic of the Plamp was hidden by some leaves.
PLAMPSWorking the purple coneflowers led me to appreciate the Wimberley Plamp. As usual, I learned some new and valuable lessons. I will admit that when I first laid eyes on a Plamp I thought that it was a piece of junk--"put any stem in those jaws and the plant will be toast." Boy, was I wrong. As it turned out, most mornings were either breezy or downright windy, and the two Plamps that I had with me saved the day time after time. If I'd have had twenty Plamps with me on the ITF Workshops I could have sold every one.
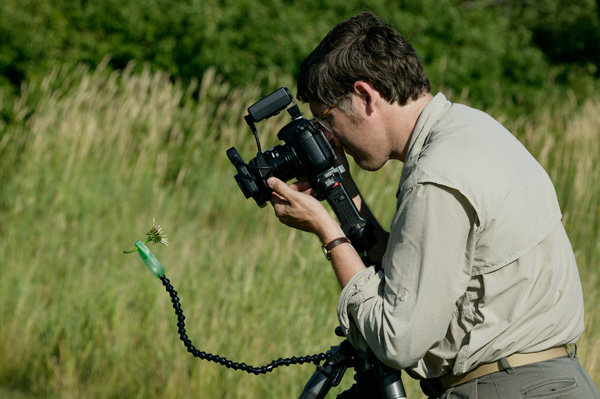
There are several ways to use this ingeniously designed double clamp. In spots where you are picking up small objects like acorns from the ground, or at locations where picking flowers or mushrooms is permitted, you can attach one end of the Plamp to your tripod and place the object in the distal clamp. This approach works well when you are using relatively fast shutter speeds. When employing slower shutter speeds it is best to attach the Plamp first to a sign, a railing, or another tripod so that the vibrations caused by your handling the camera are not transferred to the subject via the Plamp.With the tripod low to the ground, you can simply clamp one end to your tripod and hold the stem of the flower in place with the other clamp. Better yet, use a large metal stake or another tripod in these situations so that the flower does not move when you move your tripod or when you depress the shutter button. The clamp on the distal end of the Plamp has several sized notches for varying stem thicknesses. Just use the appropriate sized notch and you avoid damaging the stem...Todd Gustafson using Plamp for macroImage copyright 2003 Arthur Morris/BIRDS AS ART
The Plamps were in high demand on the Chicago In-The-Field Workshops
A PRIMER ON COLOR TEMPERATURES FROM ELLEN ANONSetting the color temperature on a digital camera is commonly referred to as setting the white balance. With a film camera the corresponding issue is using the correct film for the type of lighting - i.e. "outdoor film," tungsten film, etc. The color temperature/white balance setting that you choose on a digital camera determines how cold/blue, neutral, or warm/red/yellow the resulting image will appear. If you set the camera on "auto white balance" the camera chooses for you - and often does a surprisingly good job. You can, however, use a setting of "cloudy" or "shade" even on a sunny day outside to give an effect similar to having used a warming filter (perhaps an 81 A or B) with film. By varying the white balance settings you can achieve effects similar to having used a variety of filters from blue to yellow. If you shoot RAW rather than JPEG, the white balance setting you have selected is actually not applied until you convert the image to a TIFF file - and you can in fact change your mind and set the white balance differently at the time of conversion. With some converters such as the Adobe Raw Converter-- which currently and unfortunately requires a work-around (or fix) to use with the 10D, you can actually set the white balance in continuing increments while watching real-time previews of the image. This can be incredibly useful. The bottom line, however, is that setting the white balance/color temperature in the camera is related to the lighting conditions under which you are taking the picture. Sunny for sunny conditions, cloudy for cloudy, flash for flash, tungsten, fluorescent, etc. You can set custom white balances which can be useful for studio work. In such cases, you photograph a white object under the exact lighting conditions that you will be using and then set this as the custom white balance setting using the instructions in your camera's manual. Most outdoor/nature photographers do not find this to be very useful in the field, but theoretically there might be times--in deep shade, for example--when it might be helpful.
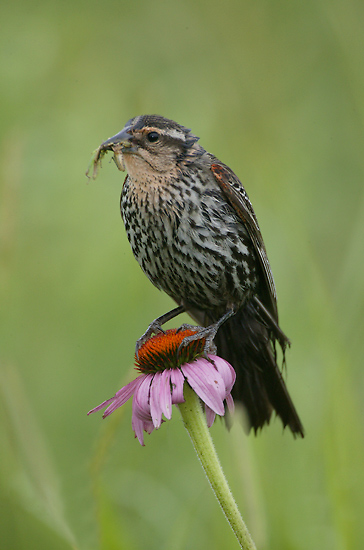
There is a separate setting for color temperature available on the 10D (and on the 1D and the 1Ds). This comes into play only when and if you choose "K" as your White Balance setting. In this case you are usually telling the camera the specific temperature of the light in which you are shooting and you would need a light temperature meter to do so accurately. Canon recommends that you do this only for outdoor lighting, not for artificial light. So, for example, if you wanted to use the "K" setting you could set it specifically for the lighting conditions at the time you were shooting ... a given number might be right for a specific sunrise, another for a couple of hours later when the sun is much brighter and the light much cooler. While on the surface this may seem like a useful idea, most photographers have no practical way of adequately assessing the light temperature outdoors and will find that the AWB or one of the preset WB settings (such as cloudy, shade, sunny, etc.) are more than adequate. Remember that the WB setting is vital only if you are shooting JPEG. If you are shooting RAW you can adjust the WB at the time that you convert the file - and that you can preview the image and see the effects of the setting that you have chosen. For me this is much more user-friendly than trying to guess the color temperature in the field. I leave the color temperature setting on my camera at 5200, which is the Canon default setting; I never use the "K" setting. If you leave WB on AWB, the camera chooses a setting between 3000 and 7000. On "sunny" it sets the temperature at approximately 5200, "cloudy" at 6000, "shade" at 7000, "tungsten" at 3200, etc. The camera is actually setting the color temperature for you. The number that you have set for the color temperature does not affect anything unless you have first chosen "K" as your white balance setting.As mentioned earlier, the white balance/color temperature setting on your camera relates directly to the lighting conditions in which a given image was created. The color temperature setting on your monitor relates to how you will be viewing your images. Obviously you want this to be consistent rather than to vary image by image. Although some people use settings of 5000 - 5500 for their monitor, most find that things look more natural to their eyes if they set their monitor to 6500.Ellen is a freelance nature photographer who specializes in digital photography. She conducts Photoshop workshops, and in addition offers individualized instruction in both photography and Photoshop. Click here Ellen Anon if you'd like to check out Ellen's images and learn about her upcoming workshops.Red-winged Blackbird, female with food for young,Peck's Farm, Chicago, ILDigital capture with Canon EOS 1Ds, 500mm f/4L IS lens, & 2XII teleconverter. ISO 500. Evaluative metering at zero: 1/250 sec. at f/8.0. Fill flash at - 1 1/3 stops with Better Beamer.
Image copyright 2003 Arthur Morris/BIRDS AS ART
In the low light of early morning I need ISO 400 to allow for a relatively fast shutter speed. It took me days of trying to come up with one after seeing Todd's killer image of this bird that he made early on while I was teaching some macro mini-lessons.