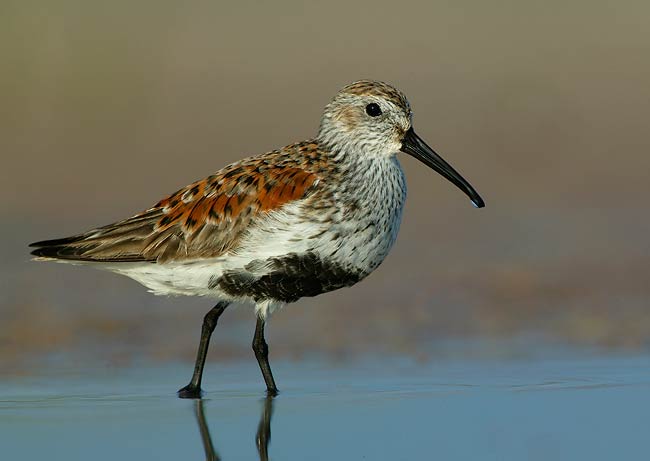
Canon 500mm f/4 L IS lens with 2X II TC and Canon EOS 1Ds camera body on panning ground pod. AI Servo AF/central sensor only with 2X, ISO 250. Evaluative metering +1/3 stop in early morning light: 1/400 sec. at f/11.
Understanding Light-Angle, Subject-to-Film Plane Orientation, and Head-Angle
At this point you may be thinking, “This guy is nuts: how can he offer us an entire chapter comprised of only 2203 words of text?” The answer is a simple one: the failure to understand the importance of how light-angle and head-angle relate to both Subject-to-Film-Plane orientation and to the quality of the final image ruins more bird photographs than all other artistic and design factors combined. I’d say that at least three-quarters of the images of birds presented for critiquing on BIRDS AS ART Instructional Photo-Tour critiquing sessions or on the various Internet nature photography sites suffer from improper light angle, improper head-angle, or both. As you approach a bird or a flock of birds, your primary consideration in nearly all cases will be Light-Angle, so that is where we shall begin.
Light-Angle
I am a huge (one could say obsessed) fan of direct frontal lighting. And surely all IPT participants would tell you that I am—among all natural history photography instructors—its biggest proponent. Except when creating silhouettes or working in other backlit situations, I want my shadow pointed directly at the bird in almost all cases. I simply do not like many side-lit images of birds—expose for the highlight side and the shadowed side loses all detail. The concept is a simple one. I want the bird in front of me with the sun coming right over the top of my head. It bears repeating: I want my shadow pointed right at the subject. (In low light situations, you almost never want to have your shadow fall either partially or completely upon the subject. In these instances, work off-angle to the light just enough so that your shadow does not appear anywhere in the image.) Ideally, connecting the dots between the light source (the sun), the photographer, and the subject will yield a straight line. With birds, and many other natural history subjects as well, utilizing this direct frontal lighting will yield images of subjects that are evenly and pleasingly lit. There will be no shadows cast by parts of the bird falling on the bird itself...
Realize also that when making backlit or silhouetted images, the most dramatic results will be possible when the subject is on the line drawn between the photographer and the light source; in other words, you need to position yourself so that the subject is precisely between you and the sun.
Subject-to-Film Plane Orientation
The subject-to-film-plane orientation is an important consideration in the basic design of an image. In many of the images that I make—especially those stationary birds, I usually strive to position myself so that the bird is either parallel to—or roughly parallel to—the film plane. The resulting “side” or “field guide” portrait reveals much of a bird’s beauty and since you are seeing exactly one-half of the bird, images of this type hide nothing. This parallel-to-the-film-plane orientation is an especially attractive choice when working in horizontal format.
While photographing birds when their flight path is exactly parallel to the film plane, the nicest images almost always feature the bird with its wings in the full upstroke or the full downstroke position. If someone tells you that capturing such images is a matter of skill and they are using a digital camera, see if you can entice them to place a series of wagers with you… You will clean them out in short order. At one time, I thought that it was possible to determine wing position by timing the release of the shutter, but once I switched to digital I learned that I was badly mistaken. I would think, “Got that one with its wings up,” only to see that the image had been made while the bird’s wings were in the full downstroke position… The best way to ensure making a few images that feature ideal wing position is to use a camera with a fast frame rate and, once the bird enters the ideal image-making zone, keep the hammer down, that is, depress the shutter button until the bird is past your position or until you are no longer able to maintain autofocus. Images made from the side with the bird’s wings edge-on to your position pretty much never succeed; you would not want to photograph a pancake from the side!
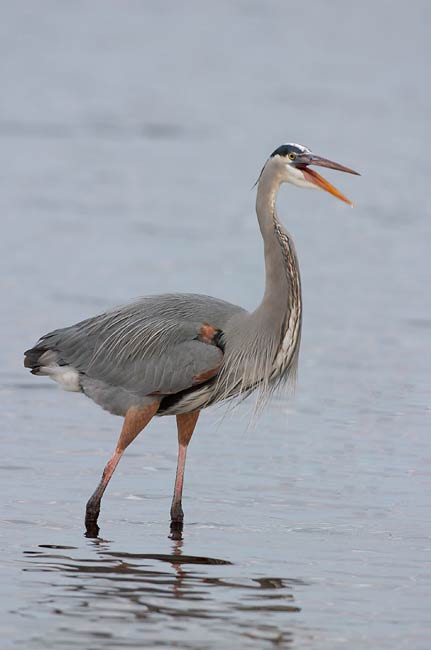
A second option is to feature a bird that is angled towards the film plane. The bird may be angled just a bit towards you, nearly facing you, or anywhere in between. These types of orientations work well with both horizontal and vertical compositions, and are especially effective when the bird opens its mouth to yawn or to call—the better to look down your throat, my dear! The same can be said in instances where the subject is facing directly at the camera. These types of images, especially when the bird is staring right down the barrel of the lens, can have high emotional impact; avian subjects can—depending on the species or family—look serious, comical, threatening, irritated, puzzled, inquisitive, belligerent, or studious among others. Perhaps it is when birds are looking right at us that they appear most human… Either of the facing forward orientations (angled or direct) works well with flying birds. And if the bird is angled only slightly towards your position, even the wings edge-on position can yield some pleasing compositions.
The most difficult orientation to deal with occurs when a bird is facing directly away from the film plane (and from you). When attempting to pull off these extremely difficult types of images, it is almost always best to work in vertical format and to maximize depth of field as much as possible, the latter because an out-of-focus tail coming right at the viewer will always be a sure image killer. (Note: there are two head-angle options available here.) The traditional approach is to make the image when the bird has its head turned 90 degrees back towards the camera, that is, when the head is parallel to the film plane. A less frequently used strategy here is to create the image when the subject is looking directly away; this may work well when there is a particularly striking pattern on the bird’s back or hind neck.
Do understand, that in almost all cases, subject-to-film-plane orientation will be determined by wind direction. Unless it is dead calm (or close to it), or your subjects are in a sheltered area, most birds will face directly into the wind. And this holds true not only for birds in flight, but for birds resting on an open beach, for birds perched in a tree or on a wire, or for birds sitting on a clean perch at your feeding set-up. It is important to understand that the very best light angle/wind direction combination for flight will usually not be best for working a group of roosting terns and skimmers.
Here are the basics.
1- Wind and sun together, that is, from the same direction: ideal for flight, good for birds on the ground or perched.
2- Wind and sun direction roughly 90 degrees from each other, good to very good for flight photography, excellent for stationary subjects; the perfect conditions for making images of birds parallel to the film plane. As a general rule, I will photograph as much as ten to fifteen degrees off of the light angle to ensure that the subject is parallel to the film plane, but will wait until the bird turns its head back into the light before making an image.
3- Wind against sun: generally poor for all types of bird photography unless you can find subjects in sheltered areas. (Note: in all difficult conditions, try to allow yourself to think way outside of the box.)
Consider the following scenario. It is 5am on the first morning of a Southwest Florida BIRDS AS ART/Instructional Photo Tour when I meet the car-pooling group in the parking lot to exchange pleasantries. We are headed for one of my favorite spots on the planet, the Venice Rookery. Lots of folks, seeing a clear night sky filled with bright stars, remark that it will surely be a great morning. Noting that a cold front had passed through during the night and feeling a chilly northwest wind on my cheek, I inform them that despite the bright sunny conditions that we will encounter, we will have a difficult morning that will offer very little in the way of good flight photography. “How can you possibly know that?” several ask almost in unison. “It’s easy,” I respond. “The sun rises in the south/south east. With the wind from the northwest the birds will be flying and landing away from us so that they can land into the wind. And even the birds at the nests will tend to face into the wind (and again, away from the light) as they perform their age-old courtship rituals and feed their chicks. Things will be better this afternoon at our White Pelican spot as the wind will most likely switch to the west. With the sun setting in the south/southwest, the huge, white birds will be flying, landing, and even standing facing into the wind and into the light.”
For flight photography, winds from the south or those with an easterly component in the morning are ideal as such conditions will find the birds flying and landing into the wind as you have the sun behind you (with your shadow pointed almost directly at your incoming subjects). Likewise, winds from the south or those with a westerly component will yield excellent conditions for flight photography on sunny afternoons. Strong southeast winds in morning or strong southwest winds in the afternoon are perfect for those wishing to make images of birds braking in flight while coming in with their landing gear down.
Northwest winds in the morning and northeast winds in the afternoons are generally the kiss of death for flight photography, but never give up; try thinking outside of the box while letting your creative vision expand when conditions appear to be bleak. Here are some of the ways that I have come up with to save the day when the wind against sun combination made things difficult:
1- Utilize direct backlighting to photograph birds in flight or landing. Light shining through the wings of a Snow or Ross’ Goose or any of the egrets or terns can be a beautiful thing. Add flash if needed (but remember to be careful when pointing your Better Beamer anywhere near the sun lest you melt a big hole in your flash…)
2- Look for diving groups of Brown Pelicans. While the pelicans will make their approaches into the wind (and thus, away from the light), just before they dive they turn so that when they are in full dive the sun lights their backs directly. I actually prefer these top-shots of diving birds to the images that show the bird’s undersides.
3- If the wind is not quite opposite the sun, you may be able to capture a nice over-the-shoulder pose or to make some nice images of banking birds.
Head-Angle
Understanding the importance of the angle of the bird’s head relative to both the light- angle and the film plane is crucial to those striving to produce powerful, appealing images on a consistent basis. Images of birds facing slightly or well away from the camera are rarely successful. Ideally, when the subject is roughly parallel to the film plane, the bird’s head should be parallel to the film plane, or—better yet in most cases—just a bit inside of parallel, that is, turned two or three degrees towards the film plane. Assuming a perfect light-angle, I actually prefer the latter for several reasons. With the subject’s head turned slightly towards the film plane, the tip of the bill will generally be on the same plane as the eye, so even when one is working at wide open apertures the image will appear sharper overall than in an image where the bird’s head is precisely parallel to the film plane. Furthermore, when the bird’s head is cocked slightly towards you and the sun is directly behind you, the face will be illuminated immaculately and the image will almost always feature a catch-light in the eye.
With birds facing to some degree towards the camera, it is usually best to make the photograph either when the bird is looking directly at the camera or when its head is aligned naturally with its body. Having the bird’s head parallel to the film plane when the subject’s body is angled towards the film plane usually looks a bit unnatural. When the body is angled partially or totally away from the film plane, it is—as noted above--almost imperative that the bird’s head be parallel to the film plane. At times, it is possible to get a bird to turn its head towards you by making a sharp raspy “queek” sound (though at times this may scare the subject away). Often it is best to simply wait (and pray) for the bird to turn its head…
Canon 500mm f/4 L IS lens with the Canon EOS 10D camera body. AI Servo AF/all seven sensors illuminated, ISO 400. Evaluative metering at zero: 1/125 at f/5.6. Flash at zero!
.....
The most important concerns for any digital camera in cold weather use are condensation and battery performance. Even when the ambient temperature is above 0 degrees Celsius, there are situations where you have to take precautions to prevent condensation from damaging internal components such as circuit boards, etc. That's one reason why we recommend placing cameras, including but not limited to the EOS-1D (and the 1DS), in airtight plastic bags before bringing them from a cold environment to a significantly warmer one. This allows the condensation to form on the bag (rather than on or in the camera), thus protecting the equipment as much as possible.
Memory cards are another potential weak link. Canon doesn't make its own, so it's best to check with the card manufacturers and other photographers to get a cold weather rating.
As with current film-based electronic cameras, items such as LCD data displays are the only means available to indicate camera settings such as shutter speeds, apertures, frame count, etc. Digital cameras add another type of LCD for use as a playback monitor. The information normally seen on these displays tends to disappear when temperatures drop below -20 degrees Celsius (-4 F). LCDs usually start working again when the temperature goes above freezing, but that won't do you much good when you are out in the cold.
Chuck Westfall
Director/Technical Information Dept.
Camera Division/Canon U.S.A., Inc.
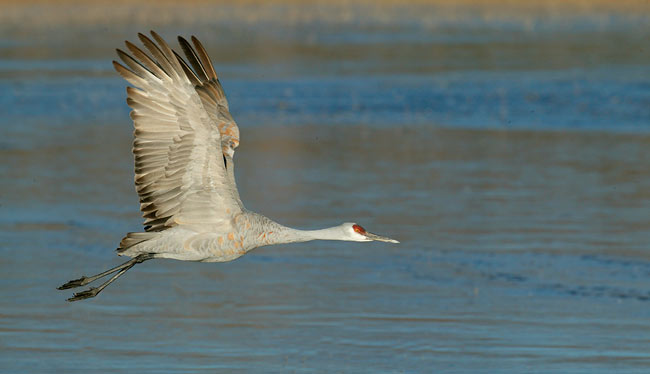
Image copyright 2003 Arthur Morris/BIRDS AS ART
Canon 600mm f/4L IS lens with EOS 1Ds camera body. AI Servo AF--the third focusing point from the left was selected manually.
ISO 250. Evaluative metering -1/3 stop: 1/1000 sec. at f/11.
Thanks to IPT veteran, Bulletin Subscriber, and friend John Henderson for alerting me as to the availability of the Canon EP-EX15 Eyepiece Extender for the 10D.
John suggests that eye-glass wearing photographers who have a problem viewing the entire image through the viewfinder of the 10D will do much better with the Eyepiece Extender in place. (John, who wears trifocals, had his viewfinder problems totally eliminated).
Here is the B&H link to the product:
http://www.bhphotovideo.com/bnh/controller/home?O=productlist&A=details&Q=&sku=278247&is=REG
(Do note that there was only one in stock as of this morning...)
Artie
Note: Arthur Morris has been a Canon contract photographer since 1994 and continues in that role today. Hunt's Photo of Boston, MA is a BIRDS AS ART sponsor, as is Delkin Devices. Do feel free to forward this Bulletin to one or more photographer-friends. Those wishing to subscribe click here mailto:http://birdsasart.us1.list-manage.com/subscribe?u=94ad23bd96f48a1de2ca612b3&id=bdb4a511a0?subject=subscribesubject=subscribe If you received this bulletin in error, or would like your name removed from the subscriber list click here birdsasart@verizon.net?subject=unsubscribe Back issues of relevant Bulletins are archived on the web site at: http://www.birdsasart.com/bn.html