BIRDS AS ART BIRDS AS ART BULLETIN 210
OCTOBER 1, 2006
Visit: www.birdsasart.com
FIELD ETIQUETTE FOR NATURE PHOTOGRAPHERS
THE SAMBURU WATER DRIP
BOSQUE & POST X-MAS IPT UPDATES
COLD WEATHER GLOVES
BAA KUDOS
JUDD PATTERSON
ALBUQUERQUE SEMINAR/HUNT’S PHOTO ATTENDING
FORT DESOTO SITE GUIDE UPDATE TOMORROW!
DELKIN e-FILM PRO COMPACT FLASH CARDS/CRAZY LOW PRICES
Contact us by phone at 863-692-0906 (Eastern Time Zone) or by e-mail at birdsasart@att.net or birdsasart@verizon.net. The att e-mail address is best from overseas.
We gladly accept credit card orders by phone 8am till 9pm Eastern Time.
You can use the Paypal links on the web site to order anything. Just type in the item(s) and the amount. If using your own Paypal account, please send to either of the e-mail addresses above.
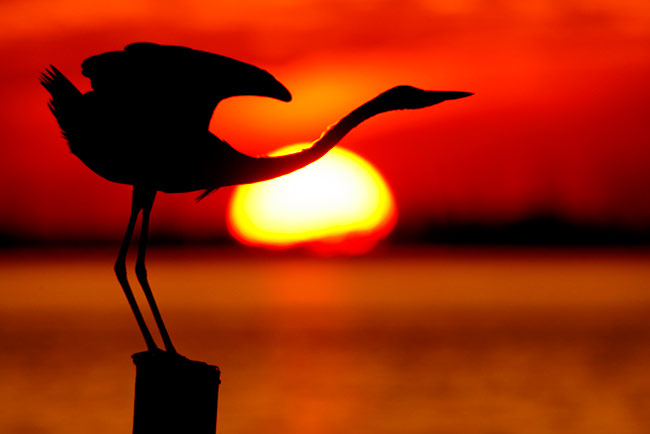
Great Blue Heron beginning stretch, near Fort DeSoto Park, St. Petersburg, FL
Image copyright 2006:Arthur Morris/BIRDS AS ART
Canon 600mm f/4 L IS L lens and with EOS-1D Mark IIN. ISO 400.
Evaluative Metering at zero: 1/1000 sec. at f/6.3 (set manually). .
I left DeSoto a bit early on Thursday afternoon because it had clouded over. On the way back to the motel, I noticed a clearing on the horizon and thought that there was a chance for a good sunset. When I saw this bird on a post, I sprung into action. As the color developed, I became more and more excited. And when I saw this image on the LCD screen I jumped up and down with joy. I was so nervous with excitement that I could barely operate my camera controls. My new spot is killer for sunsets because there are no bridges, lights, or buildings at all on the far shore. I will reveal the exact location in the DeSoto Site Guide update that I hope to distribute late Monday.
Important Request: if responding to this e-mail, please take the time to delete all images and all irrelevant text.
Photographic Theme: A potpourri of images
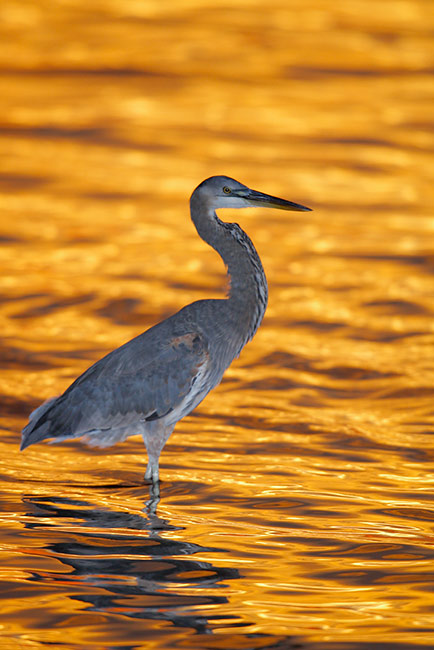
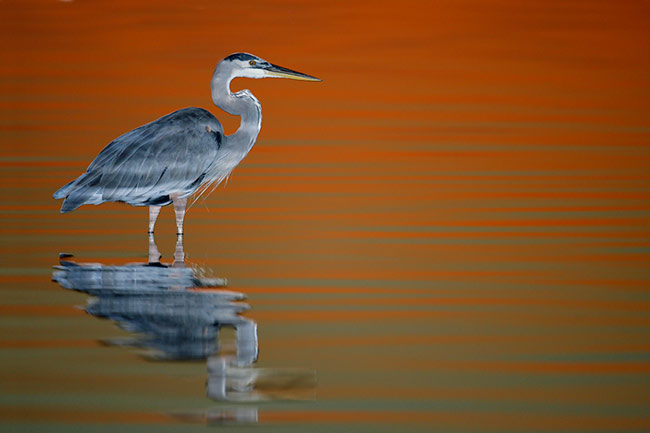
Great Blue Heron in golden water, near Fort DeSoto Park, St. Petersburg, FL
Image copyright 2006: Arthur Morris/BIRDS AS ART
Canon 600mm f/4 L IS L lens and with EOS-1D Mark IIN. ISO 400.
Evaluative Metering at zero: 1/400 sec. at f/5.6. Flash at -1 stop (effectively as main light) with Better Beamer.
Same location as the image above, five minutes later. Another great thing about this spot is that there are usually a few fishermen around. Here I chose to go with the metered exposure to intensify the golden hues (rather than adding light to come up with a more “correct” exposure. You can learn everything that I know about flash in “ The Art of Bird Photography II” (936 pages on CD only): http://www.birdsasart.com/ABPII.htm Do note that if I had not used flash here the image would have been a silhouette.
FIELD ETIQUETTE FOR NATURE PHOTOGRAPHERS
I received the e-mail below a few days ago:
Hope you don’t think is to dumb of a question J Being a beginner in bird photography, what’s the etiquette for approaching other photographers that are already on location capturing birds? For example…you’re on a beach photographing a pelican. I’m coming up from behind. Do I ask if it’s ok to approach? Stand behind you at a safe distance? Go somewhere else? Do something else? The reason I ask is, the last thing I want to do is lose a chance for the other guy cause I approached incorrectly, or maybe clicked my shutter (or flash) before he did…causing the bird to take off. Thanks, Doug
I realized that this topic is one that I discuss often with my IPT groups but that I had never written specifically about it… So I did. Thanks Doug!
Field Etiquette for Nature Photographers
I was walking along a narrow path next to the lagoon. About 50 yards ahead of me there were two American Oystercatchers foraging. The only problem was that 35 yards ahead of me a photographer lay on his belly photographing the pair. They were catching big worms and the light was lovely… What to do? The guy on the wet sand was facing away and was not aware that I was there. If I called to him (to ask if I could join him) I risked scaring the birds away. So I stood there for 30 minutes and watched enviously. Finally I decided that I would join him by starting my crawl from way back so as not to flush the birds.
I advanced slowly a few yards, remaining well outside of this species usual circle of fear. I slowly and carefully got down on one knee and the birds did not notice me, but as I lowered myself to the prone position, one of the birds (to my dismay) screamed its strident alarm call. Both birds leaned forward and took flight. I felt absolutely terrible and was about to explain that I had waited for half an hour when the photographer turned towards me and exclaimed, “Artie, it’s great to see you!” Then Tim Fitzharris (friend, well-known professional nature photographer, and one of the folks who inspired me early on) reached into an upper pocket, grabbed his walkie-talkie, raised his wife (who was in their small motor home nearby with their son Jesse), and said, “Joy, you would not believe whom I met while crawling in the mud.”
Folks are usually not so glad to see you when you scare their subjects away…
You are walking down a desolate beach when you see a photographer working a beautiful Reddish Egret, a species you have dreamed of photographing. What to do? First off, as we saw in the example above, you need to stay well back. If you opt to leave the photographer and his subject, be sure to give both a wide berth while passing them. Many photographers think, “I will be polite and walk around this situation,” and then they choose a route that flushes the bird (or especially, the flock of birds; it is usually easier to approach a single bird than it is to approach a flock: scare one, scare all…) As a general rule, plan your route by doubling the distance that you think necessary to avoid flushing the subject(s).
You have another option if the photographer is aware of your presence. You can then ask as quietly as possible or gesture by pointing appropriately to indicate “Can I join you?” If they nod or assent, you need to be especially careful as to how you make your approach. First, you must consider your route. Approaching from directly behind the photographer is almost always best. You can actually hide behind the person who was there first as you make your approach. If the photographer is standing, you need to keep the front leg of your tripod low; it is often best to carry your tripod in front of you (rather than on your shoulder). And you need to move slowly, very slowly. I am often amazed at folks who think that “slowly” means to walk as if you were in a supermarket… If you are walking through shallow water or muck or algae, listen to your footsteps. By doing so and placing each foot down carefully you can make your approach much less obtrusive.
If the photographer is kneeling you need to get on your knees while you are well back and then make your approach slowly. If the photographer is down on his belly, you need to get down on your belly, again, while you are well back, and crawl your way in. Walking right up to a photographer who is either kneeling or crawling is unconscionable. In all cases your number one concern must be to avoid flushing the subject or the flock.
If there is only one flock of birds in sight, and there are several photographers already in position, then you have a bit more freedom; you can approach carefully without asking, but again, you need to take great care to avoid flushing the flock. There are many grey areas here… In some situations, as with an obviously tame bird, you can simply approach without much concern. An example might be a fisherman-friendly Great Blue Heron that is used to being in close proximity to humans. As with all aspects of photography, knowing your subject is of tantamount importance. If I came across someone photographing a Horned Lark while lying flat on the grass I would never even consider approaching as this species is notoriously flighty.
If you encounter a tour group that is photographing the only birds on the beach, then joining them would—in my opinion—be appropriate. If, however, they are tossing fish to attract the birds, then it might be inappropriate to join them unless you ask or are invited to do so. An option would be to take a position well behind the group while using a longer lens. And, by the way, if you are a member of a tour group, the restrictions on approaching birds or animals being photographed by another member of the group are greatly relaxed. That said, be sure to move slowly and to get low if need be. And if you are a member of a tour group, it is imperative that you be doubly considerate of other photographers who are not part of your group
(At Homer, Alaska, this past March I spent more than $1,400 on fish for the Bald Eagles; herring is a healthy eagle snack. Many photographers, certainly more than a dozen, followed my group around the Spit as if they were members of the group. They joined right in, often getting in front of the folks in my group. Though I did not say a word—except to those who carelessly stepped in front of others—I firmly believe that their behavior was inappropriate. When folks are paying for a service, it’s rude to intrude.)
In all group situations, it is imperative to be aware of the position of the others in the group. If someone is looking through their viewfinder at a subject, you are not free to walk in front of them as you please. To do so is very inconsiderate. You can either walk behind them or, you can ask them if it would be OK for you to pass. When I want to get by someone quickly, I often stand just outside the field of view and say “Say when…” implying that they should let me know when it is OK to pass.
If you want to walk in front of someone who is changing teleconverters or chatting with a friend then you can do so with impunity. I saw a woman at the Venice Rookery berate another photographer for walking in front of her tripod mounted lens (even though the complaining photographer was more than 10 feet away from her lens! If you are photographing with a group, and you opt to stay well back from the subject or the flock while everyone else is photographing the same subjects from much closer range, it is usually best for you to adjust your position in response to the folks up front changing their positions. I have seen folks photographing from hundreds of yards away chastise other photographers who were working a tame subject from much closer range. If you choose to stay well back, you are the one who needs to move a bit…
If you have worked hard to get close to a great subject or a flock of birds (working the edge of a flock is usually best…), be sure to exit as carefully as you approached so that you do not disturb the birds. And that is true whether you are by yourself or with a large group. I have –countless times in a variety of situations—seen a selfish photographer who is finished working a bird or a group of birds simply stand up when they were done thus flushing the bird(s). That is like saying, “I am done and I do not care at all about you or the birds…”
If you are photographing migrant songbirds in wooded areas or edges (such as The Tip at Point Pelee National Park near Leamington, Ontario or at the Convention Center on Padre Island, TX), the guidelines are quite different. If there are several photographers around, it is pretty much open season as the warblers, tanagers, vireos, and the rest of the cast are usually intent on feeding and are pretty much oblivious to our movements. Be sure, however, to move slowly, to be fairly quiet, and to avoid cutting in front of others. In such situations the birds move to the next bush or fly away pretty much when they are ready to… On the other hand, if there is a single photographer in the woods working a thrush—they are usually quite skittish, it is usually be best to take another path and search for your own bird. Another option would be to stand quietly and hope that the bird moves towards your position.
Here are some guidelines when photographing from your vehicle on a refuge tour route or a shoreline with vehicle access (like East Beach at Fort DeSoto Park in St. Petersburg, FL.) If the car in front of you is close to a skittish subject, it is best to either give them a few minutes with the subject before trying to get into position, or, if possible, to pass them without scaring off the subject. If in doubt, it is best to give them a few minutes with the subject before you attempt to go by them. If you are sure that the bird or animal is tame, you can approach at any time. When you do approach, do so slowly and with extreme care. It is best to approach subjects with your telephoto lens in place on the window; raising the lens and sticking it out the window once you are close to the subject will often frighten it away. Here’s another fine point: if you position your vehicle in front of the car that was on the scene first and the animal moves towards you position, you are not obligated to move your vehicle. If the other driver is savvy, they will simply pull ahead of you and hope—as is often the case—that the subject continues to move in the same direction.
Under no circumstances is it permissible to leave your vehicle and approach a photographer working from their vehicle. At Merritt Island, I had just pulled up to a huge flock of White Pelicans doing their group feeding thing in a pool right next to the road when a car pulled up behind me. The guy got out with an intermediate telephoto lens and the birds all flew away, about two miles away… And a few days ago at DeSoto I had a group of five American Avocets right outside my car. Another photographer left his vehicle, walked several hundred yards towards my position with his big lens on his shoulder, and scared all the birds away. You gotta love it. When the inevitable occurs, it is fine—if you are comfortable doing so—to let the offender know politely that their behavior was inappropriate. No matter how egregious the offense, screaming or cursing will not help the situation at all.
It goes without saying that we all must follow the rules when working in controlled areas. If the signs say “Stay on the Path,” then we must stay on the path. If the sign says “Area Closed,” then we must not enter. To do otherwise gives all photographers a black mark. (At present, because of the actions of a relatively few, many refuge managers consider all photographers criminals.) If you encounter another photographer breaking the rules or you might consider informing them as politely as possible that their behavior is improper. If the other photographer ignores your request, it is best to move on. You might consider jotting down a description or better yet, a license plate number, and letting the authorities know what you observed. When doing so you are—in my opinion—obligated to leave your contact information.
The suggestions above are only guidelines (but they are based on 23 years of field experience). There are surely lots of grey areas and close calls. At all times it is best to obey the posted rules, to be considerate of others and the subjects that they are photographing, and to remember that no image is worth disregarding the welfare of the creature that we are photographing.
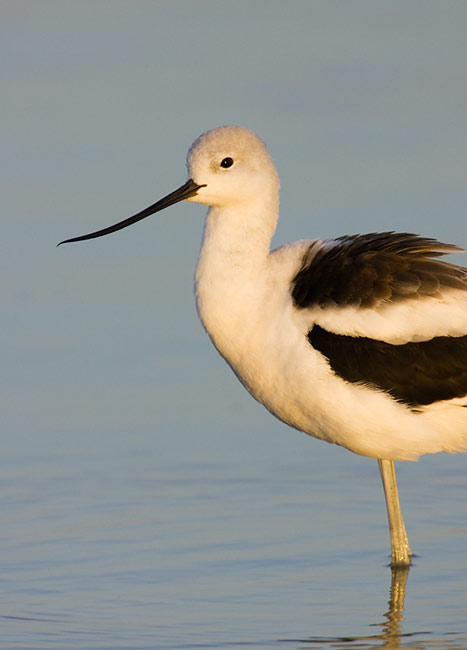
American Avocet, winter plumage male, Fort DeSoto Park, St. Petersburg, FL
Image copyright 2006: Arthur Morris/BIRDS AS ART
Canon 600mm f/4 L IS L lens with 2X II TC and EOS-1D Mark IIN. ISO 400.
Evaluative Metering +2/3 stop: 1/320 sec. at f/10. Image made from vehicle with rig on BLUBB: (http://www.birdsasart.com/blubb.htm)
I was pretty much amazed when an experienced photographer who should have known better left his vehicle and walked about 200 yards towards the spot where I was photographing a group of five rather skittish avocets in late afternoon light. It seemed as if his only purpose was to flush not only the avocets but the rest of the gulls and shorebirds. He succeeded. Note that the front end vertical composition that I used here is one of my favorites. You can learn a ton about advanced composition and image design in “ The Art of Bird Photography II” (936 pages on CD only): http://www.birdsasart.com/ABPII.htm
THE SAMBURU WATER DRIP
On the recently concluded Kenya Photo-Safari we stayed at a new lodge, the Samburu Sopa. The moment I walked towards my room and saw all the birds and the dry bush habitat, I knew what I had to do. I spoke to the manager, borrowed a shovel, and got to work. The soil was extremely rocky; digging the shallow pool required quite a bit of effort, but I knew that the potential rewards were great. After I dug the pool, I lined it with one of the heavy duty plastic bags that I keep in the back pocket of my X-tra Hand Vest (http://www.vestedinterest.com/ and http://www.birdsasart.com/bn61.htm). I selected a few decent-looking rocks and a perch or two, and put them in place. I found a discarded water bottle, punched a tiny hole in it with the tip of a scissor, added water, tied it to a bush, and adjusted the flow rate by loosening and tightening the cap a bit. Then I added water to the pool and kept the spaces below the rocks stocked with bread crumbs and the like. Within 24 hours, my little set-up was swarming with birds, none of which I had ever seen or photographed before. It was so hot that it was necessary to add water every few hours. Below is a picture of the set-up.
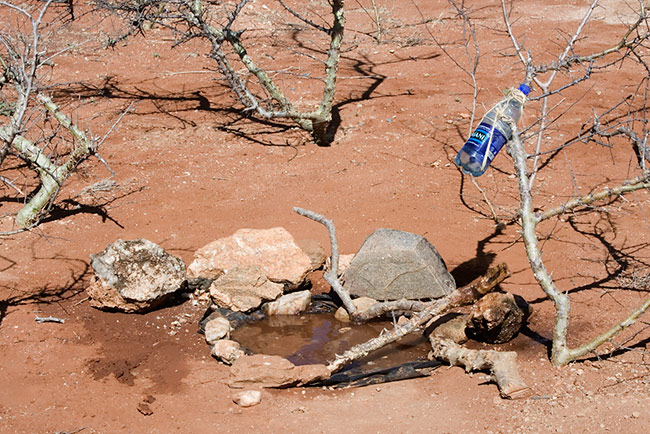
Water drip/feeder set-up, Samburu Sopa, Samburu, Kenya
Image copyright 2006: Arthur Morris/BIRDS AS ART
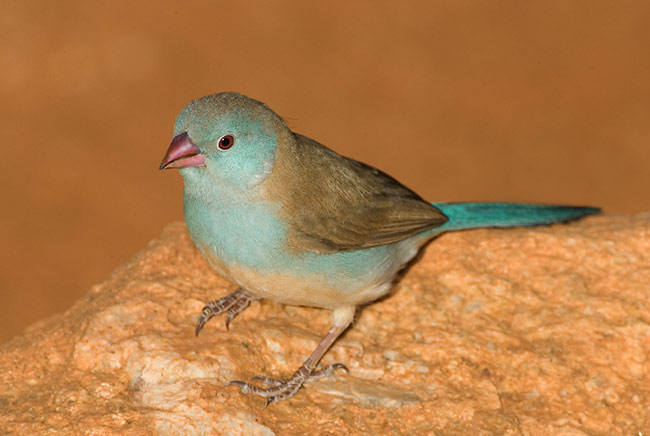
Blue-capped Cordon Bleu, male, Samburu, Kenya
Image copyright 2006: Arthur Morris/BIRDS AS ART
Canon 500mm f/4L IS lens with 2X II TC and EOS-1D Mark IIN. ISO 400.
Evaluative Metering at zero: 1/400 sec. at f/16. Fill flash at -3 stops with Better Beamer.
On the morning that were to fly to Maasai Mara, some of us skipped breakfast to spend a last hour at the setup, taking advantage of the beautiful early morning light.
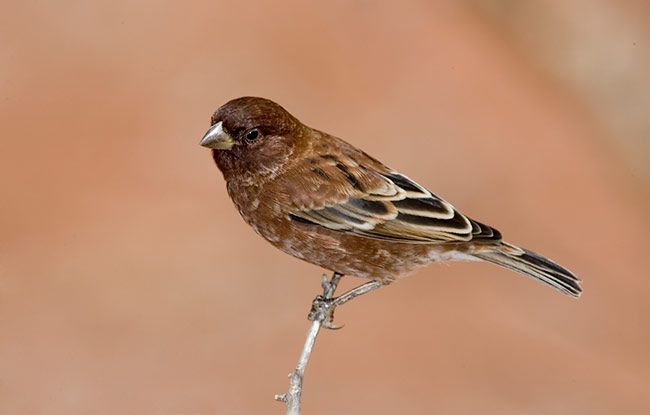
Chestnut Sparrow, Samburu, Kenya
Image copyright 2006: Arthur Morris/BIRDS AS ART
Canon 500mm f/4L IS lens with 2X II TC and EOS-1D Mark IIN. ISO 320.
Evaluative Metering +1/3 stop: 1/250 sec. at f/14. Lots of fill flash at -1 stop with Better Beamer.
This species visited the drip only infrequently. Notice that I used more flash in the bright sun than when working in early morning light (as above).
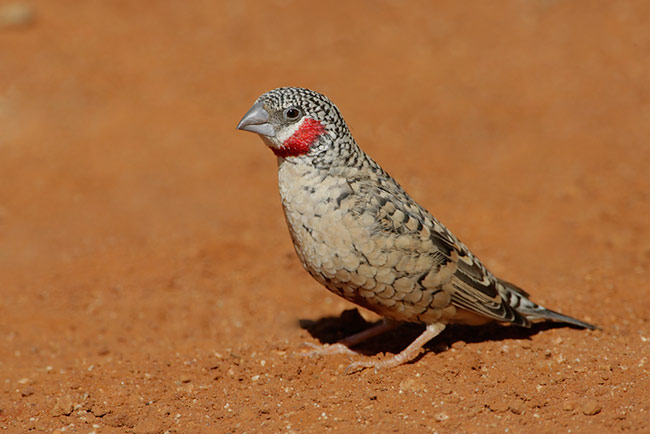
Cutthroat Finch, male, Samburu, Kenya
Image copyright 2006: Arthur Morris/BIRDS AS ART
Canon 500mm f/4L IS lens with 2X II TC and EOS-1D Mark IIN. ISO 400.
Evaluative Metering +1/3 stop: 1/640 sec. at f/13.
Notice that when working a point-blank range you need to go for some extra depth-of-field.
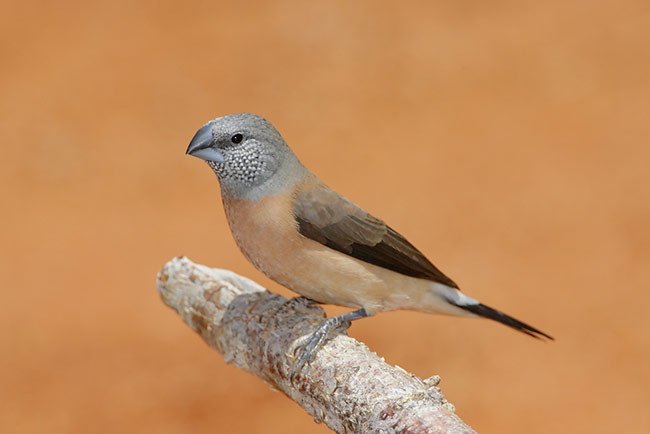
Grey-headed Silverbill, Samburu, Kenya
Image copyright 2006: Arthur Morris/BIRDS AS ART
Canon 500mm f/4L IS lens with 2X II TC and EOS-1D Mark IIN. ISO 320.
Evaluative Metering at zero: 1/640 sec. at f/11. Fill flash at -1 stop with Better Beamer.
Notice that the same background appears so much softer and out-of focus when the bird is on a perch than it does when the bird is on the ground.
(Seethe Cutthroat Finch image immediately above for comparison).
BOSQUE & POST X-MAS IPT UPDATES
We filled the two opening announced in the last Bulletin and have now had another cancellation for Bosque IPT #2. (All four had been long-sold out.) If you would like to register, please e-mail or call (863-692-0906) first and then send your deposit check.
Here are the details:
Bosque #2: "The Pre-Thanksgiving IPT" NOV 19-21, 2006. Slide Program on the evening of NOV 18. 3-DAY: $929. (One opening.) This and the next IPT have sold out for the past eight years. If you are interested in attending the Thanksgiving Day luncheon in Las Lunas, please contact us via e-mail. This IPT will feature increasing numbers of geese and cranes with lots of great opportunities.
Bosque IPTs#1, #3 & #4 are sold out with short waiting lists. Please e-mail if you would like your name added to the wait list. And please include all of your phone numbers. Thanks!
The post X-mas IPT is wide open. Late December is a great time to visit SW Florida. The Great Blue Herons at the Venice Rookery are performing a great variety of their courtship behaviors, the Burrowing Owls are out of their burrows, and Little Estero Lagoon has been great at this season for the past few years. And Sanibel is Sanibel. Here are the basics:
SW FLA Post X-mas IPT: DEC 27-29, 2006. Slide program on the evening of Tuesday, DEC 26. 3 -DAY: $1029. (Limit 14, Openings: 9) Co-leaders: Robert O’Toole, Alfred Forns, & Robert Amoruso. Sanibel Island, Little Estero Lagoon, Venice Rookery, Cape Coral. Herons, egrets, gulls, terns, skimmers, shorebirds, both pelicans, Osprey, Burrowing Owl, and lots more.
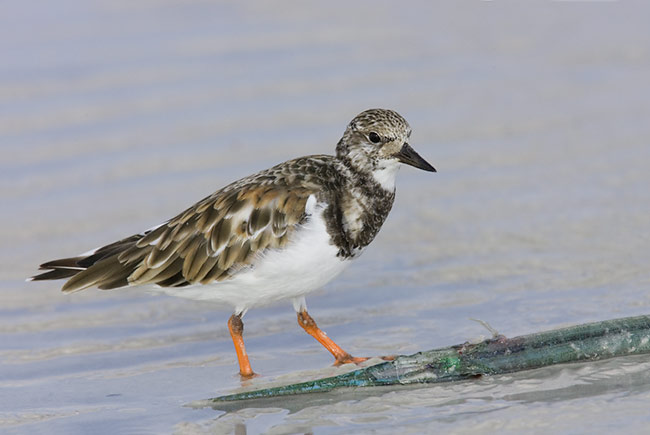
Ruddy Turnstone, winter plumage male scavenging needlefish, Fort DeSoto Park, St. Petersburg, FL
Image copyright 2006: Arthur Morris/BIRDS AS ART
Canon 600mm f/4 L IS L lens with 1.4X II TC and EOS-1D Mark IIN. ISO 320.
Evaluative Metering +1/3 stop: 1/640 sec. at f/9 (set manually).
On most mornings at DeSoto you can find something magical. This bird kept turning the fish over and over. I love here that the green dorsal surface of the fish is in view, and I love the color and the texture and the pattern of the wet sand. There was a distracting white shell right behind the fish. When the bird walked away a bit, I ran in and removed the shell, confident that the bird would return quickly. It did <smile>
COLD WEATHER GLOVES
My response to a Dan Leary mail:
DL: Hi Artie, I am on one of your Bosque IPTs; what kind of gloves do you recommend for best operation of the camera gear and protection from the cold? As a near-life-long Floridian I fear I'm going to look like the Michelin man out there.
AM: Me too. I recommend the polypropylene glove liners below a pair of fingerless mitts with the cover that pulls over to cover your fingers. Sometimes they are called Glo-mitts. Cabelas has some that are very bulky; I use them only in extreme cold. It has been pretty much impossible to find exactly the type that I like for the past several years. Eastern Mountain Sports made my favorite ones but they are longer being produced. Now I am forced to buy gloves that have the half- fingers and then cut away all the finger holes so that all four fingers (but for the thumb) go thru the opening. (The ones with the half-fingers actually constrict your fingers leaving you colder rather than warmer…) Then I add heat packs on the coldest mornings (below 26 degrees or so…)… It is important to make sure that you keep your head and your feet warm also (else your hands have no chance…) I stick just my index finger out of the large opening to depress the shutter button. Best and love, artie
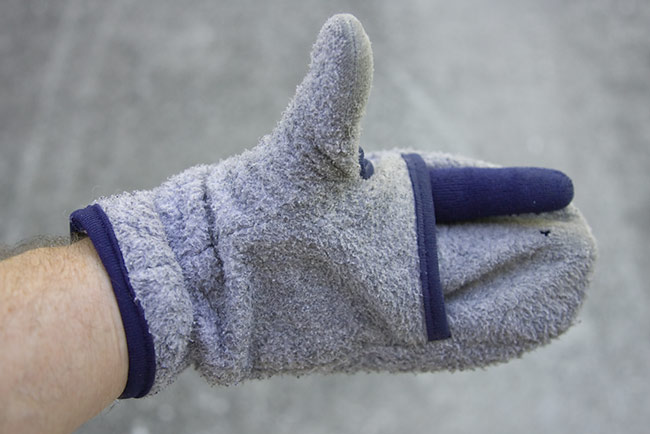
This is the Glo-mitt I love. It was formerly produced by Eastern Mountain Sports… I am down to my last pair and both have small holes in them… If anyone knows where I can purchase anything similar, please shoot me an e-mail.
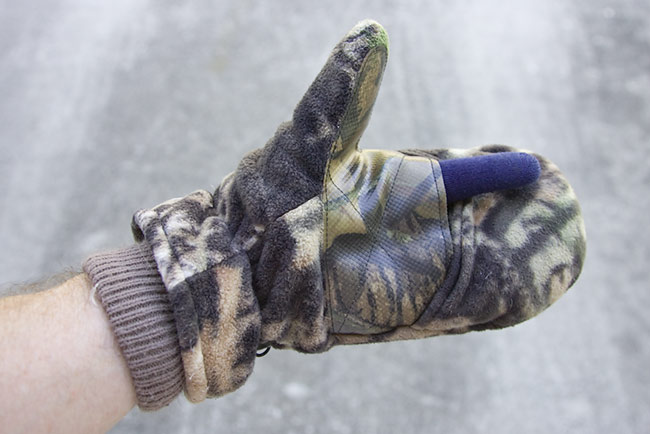
This image depicts the Cabela’s mitt mentioned in the text above. Note that I hate the models with the half-fingers… Note in both images the glove liners (dark blue) and my trigger finger ready for action.
BAA KUDOS
We received this e-mail from subscriber Loyce Hood:
Hi Artie, I just have to tell you that after using your "Digital Basics PDF", I'm amazed at the difference your workflow has made with my photos. Your method is just as you said, “fast and easy.” That was one of the best twenty dollars that I ever spent. I highly recommend Digital Basics to anyone looking to better their photography. I just finished saving a photo that I'd have deleted if it weren't for DB! Thank you so much! Loyce
And this one from Per Gunnar Bryhni:
Hello again. I received the Mongoose tripod head and the book here in Norway very quickly. I am already using the Mongoose M-262 for my Canon 400mm f/5.6L lens and it is by far meeting my expectations. It is a very nice product.
Best wishes, Per Gunnar Bryhni

Great Horned Owl hooting, near Lake Kissimmee, Osceola County, FL
Image copyright 2006: Arthur Morris/BIRDS AS ART
Canon 600mm f/4 L IS L lens with EOS-1D Mark IIN. ISO 400.
Evaluative Metering +1/3 stop: 1/1250 sec. at f/4 (set manually).
Jim Neiger was kind to invite Jim and me to photograph with him last Monday afternoon. Jim attracts this bird with a CD of recorded Great Horned Owl calls. Though I have no problem at all with the judicious use of recorded bird calls and songs to attract otherwise difficult or impossible subjects into photographic range, many folks who do so strive to keep the practice a secret… You can learn about this location and lots more of Jim’s favorite Central Florida hotspots in his Central Florida Site Guide here: http://www.birdsasart.com/siteguides.htm#CENTRAL%20FLORIDA%20SITE%20GUIDE%20AVAILABLE
JUDD PATTERSON
One of my very pet peeves is when folks come up to me and say, “You have a great lens. If I had your lens I could take great images.” It’s not the lens. It’s not the camera. It’s not where you live. And it has nothing to do with how much you get to travel. What it has to do with is the photographer’s desire, knowledge, technique, creativity, attention to detail, persistence, and their willingness to work long and hard.
Want proof? Simply take a look at Judd Patterson’s web site: http://www.juddpatterson.com/browse.php?gallery=birds
Judd’s longest lens is the Canon 300mm f/4L IS lens which he uses with the Canon EOS-30D camera body…. Congrats Judd on all those great images!
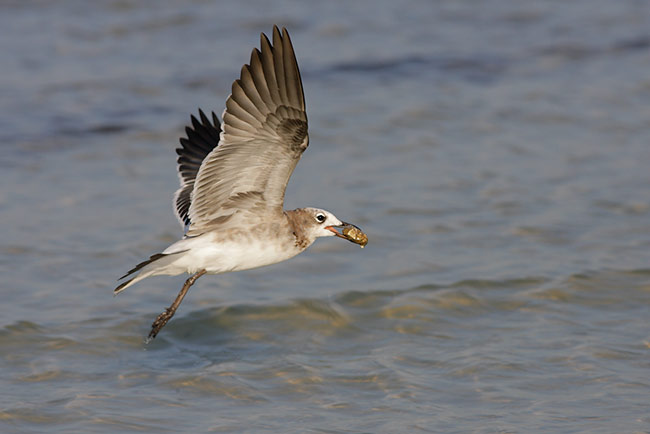
Laughing Gull, first winter with unidentified sea creature, Fort DeSoto Park, St. Petersburg, FL
Image copyright 2006: Arthur Morris/BIRDS AS ART
Canon 400mm f/5.6 L IS L lens with EOS-1D Mark IIN. ISO 400.
Evaluative Metering at zero set manually: 1/200 sec. at f/8.
Long lenses are not a necessity for those who strive to create pleasing image of avian subjects. I love taking a walk with my beloved “toy lens” just to see what I can come up with. I was using 1/2500 at f/8 for the Royal Terns with their bright white breasts and then backing down on the shutter speed a bit for the Willets and the young Laughing Gulls.
ALBUQUERQUE SEMINAR/HUNT’S PHOTO ATTENDING
We still have room for lots more folks. The Albuquerque “The Art of Nature Photography; It Ain’t Just Birds” Weekend Seminar will take place at the Park Plaza Hotel, 2500 Carlisle Boulevard NE in Albuquerque on December 2-3, 2006. Saturday will be devoted to learning the techniques needed to create pleasingly designed, technically perfect images of natural history subjects. Saturday topics will include getting the right exposure, advanced composition and image design, making sharp images, creating effective motion and zoom blurs, using flash as fill and as main light, and tips for getting close to free and wild birds and animals. Sunday will be devoted entirely to Digital Photography and Photoshop with much of the time being spent on live Photoshop demonstrations. On our IPTs I see many great photographs that are ruined because folks have no clue as to how to effectively optimize their images. Join us to learn how to make your images look great in minutes.
Gary Farber of Hunt’s Photo and Video will be traveling to Albuquerque all the way from Boston with a variety of product that we will not be offering. If you have a special request for Gary, please e-mail him at Filmguygary@aol.com .
Paypal is best but we will be glad to take your credit card information by phone (863-692-0906) or to cash your check. If sending a check, please make it out to “Arthur Morris” and send it to us at BIRDS AS ART, PO Box 7145, Indian Lake Estates, FL 33855. Be sure to include your snail mail and e-mail addresses and your day, evening, and cell phone numbers. The cost of the weekend seminar is $159. The cost of either single day is $99. Register with a friend or spouse and take $10 off each registration. Register with three or more friends and take $20 off of each registration. Here is our Cancellation Policy: If for any reason you need to withdraw, please notify us ASAP. Once we receive your e-mail, phone call, or written notice of your cancellation the following fees apply: cancel before September 2, 2006 and your fee will be refunded less a $20.00 cancellation fee; cancel by November 2, 2006 and your fee will be refunded less a $50.00 cancellation fee; cancel after November 2, 2006 and there will be no refund.
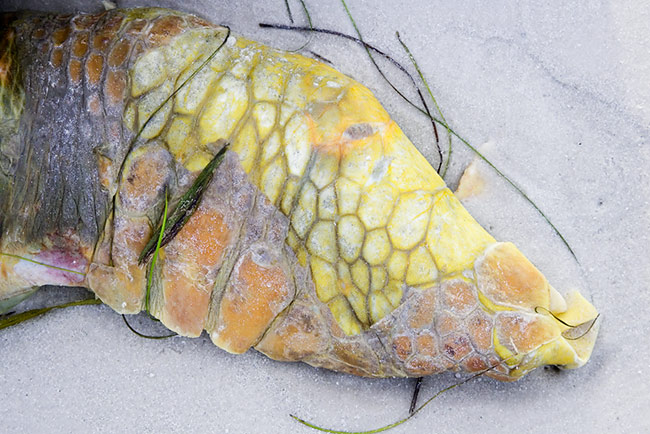
Flipper of dead sea turtle, Fort DeSoto Park, St. Petersburg, FL
Image copyright 2006: Arthur Morris/BIRDS AS ART
Canon EOS-1D Mark IIN with 28-105mm IS L lens handheld at 73mm. ISO 400. Evaluative Metering +2/3 stop: 1/100 sec. at f/10 in Av Mode
On Thursday morning there was a large, dead sea turtle on North Beach at DeSoto. Though decaying, this creature was most impressive even in death. I made a great variety of images; this one--a close-up of the flipper (missing many of the protective plates)-- was my favorite. (I wish that I had framed it a bit wider…) I never head into the field without having the relatively new 28-105 in a vest pocket. And remember, it ain’t just birds!
FORT DESOTO SITE GUIDE UPDATE TOMORROW!
I will be working on updating the Fort DeSoto Site Guide on Monday and adding lots of great images as well as the info on my new sunset spot. If you already own a copy, you should receive your udpated copy by e-mail automatically. If you do not own this Site Guide but would like to learn the ins and outs of Fort DeSoto in preparation for a photographic visit, please click here for additional info: http://www.birdsasart.com/siteguides.htm#the%20Fort%20DeSoto/Sarasota%20Site-Guide
Great Blue Heron pre-dawn, Fort DeSoto Park, St. Petersburg, FL
Image copyright 2006:Arthur Morris/BIRDS AS ART
Canon 600mm f/4 L IS lens with EOS 1D Mark IIN. ISO 400. Evaluative Metering at zero: 1/8 sec. at f/4 (set manually). Manual flash as main light at 1:4 with Better Beamer.
What's the use of photographing a great blue??? They have been photographed so many times before... I have been hearing comments like that for more than two decades but they will never stop me from trying to create something new and different. It was so dark when I made this image that the camera did not have enough light (or contrast) to focus; I rested the lens foot on BLUBB so that I could focus manually. Strangely but wonderfully, I did hear the AF confirmation beep… This image is one that we could never see as it is the flash that is lighting the shadowed (actually the silhouetted) side of the bird. In addition, the color of the water in the image is deeper than the actual sunrise colors as I used the metered exposure: 1/8 sec. at f/4. Normally, I would have added as much as two stops of light to keep the relatively light-toned water light-toned. I opted not to do that to get a faster (if you could call 1/8 sec. fast…) shutter speed and to intensify the color of the water. Note that it was the flash that resulted in an acceptably sharp image. Lastly, I used a bit less flash than was needed for a "proper" exposure for the heron (and then selected and lightened the bird) to avoid an over-flashed look. To sum up, the whole image is seemingly unreal; perhaps this is part of the reason for its success... The first image that I saw like this was a great one created by Charlie Schleicher; it appeared on an Inner Reflections calendar a few years back. Thanks Charlie for the inspiration. (Purple flash eye was repaired digitally as described in Digital Basics: http://www.birdsasart.com/digitalbasics.htm)
DELKIN e-FILM PRO COMPACT FLASH CARDS/CRAZY LOW PRICES
As most of you know, I have used Delkin e-Film Pro Compact Flash Cards for more than 3 ½ years now and have found them to be fast and dependable. I have been using the Delkin 2gb and 4gb cards exclusively now for more than two years and have experienced one card failure, that with a very old 2gb card about a month ago. Delkin promptly replaced the card. Do remember that I take tens of thousands of images in a given year. We have joined with Delkin to ensure that we can offer you the great e-Film Pro Cards at very low prices in any quantity that you might need:
1gb Delkin e-film Pro Card: $44.98
2gb Delkin e-film Pro Card: $74.98
4gb Delkin e-film Pro Card: $154.98
8gb Delkin e-film Pro Card: $299.98
Please add $7.00 per order shipping and handling. Florida residents please add 7% sales tax to the cost of the cards only.

Delkin Dependability: e-Film Pro Cards
Image copyright 2006: Arthur Morris/BIRDS AS ART
The card on the left is a relatively new 4gb Delkin e-Film Pro card. The card on the right is my first 4gb Delkin e-Film Pro card.
It has been in and out of my cameras and computers so many times that the paint is just about worn off. I have never had a single failure with any of my 4gb Delkin cards…
Best and love and great picture-making to all,
artie
Note: Arthur Morris has been a Canon contract photographer since 1994 and continues in that role today. Hunt's Photo of Boston, MA is a BAA sponsor as it Delkin Devices. Back issues of all BAA Bulletins can be found in the Bulletin Archives which may be accessed from the home page at www.birdsasart.com