
BIRDS AS ART BULLETIN #222
February 12, 2007
Visit: www.birdsasart.com
BREEZEBROWSER & DOWNLOADER PRO ON MACs
CHRIS BREEZE'S TWO CENTS
DIGITAL BASICS FREEBIE/SETTING THE GRAY, WHITE, & BLACK POINTS
DIGITAL BASICS KUDOS
BAA & BULLETIN KUDOS
THE TWO NEW IPTs
NYC SEMINAR
EVERGLADES NATIONAL PARK ONE DAY IN-THE FIELD WORKSHOPS
IPT UPDATES
Contact us by phone at 863-692-0906 (Eastern Time Zone) or by e-mail at birdsasart@att.net or birdsasart@verizon.net. The att e-mail address is best from overseas.
We gladly accept credit card orders by phone 8am till 9pm Eastern Time (8 am till 3pm Fridays).
You can use the Paypal links on the web site to order anything. Just type in the item(s) and the amount. If using your own Paypal account, please send to either of the e-mail addresses above.
Photographic theme: More of my favorite images from the recent Falklands/South Georgia/Antarctica
Magellanic Penguin, Sea Lion Island, Falklands
Image Copyright 2007: Arthur Morris/BIRDS AS ART
Canon 500mm f/4 L IS lens with 1.4X II TC and EOS-1Ds Mark II. ISO 400.
Evaluative Metering -1 stop: 1/640 sec. at f/11.
One of my goals on the F/SG/A trip was to make clean, tight head portraits of all of the penguin species. Getting this one on our first landing was a great start. Note that with the bright sun and the large area of black in the center of the frame I needed to subtract one full stop of light to avoid burning the whites. See “Exposure Simplified” in “The Art of Bird Photography II” for a complete explanation of the system that I use to determine my exposures: http://www.birdsasart.com/ABPII.htm.
BREEZEBROWSER & DOWNLOADER PRO ON MACs
For years folks have been asking me if Breezebrowser and Downloader Pro would ever be available for Apple/Macintosh computers. For years Chris Breeze said, "Never." But recently I had heard that he was re-considering his position because many serious photographers use Macs. And most recently I heard that it is now possible to use these two fantastic programs on Mac platforms but the things that I had been hearing confused me, so I asked my posse (my cadre of fantastic assistant instructors) member Robert Amoruso to write a short piece that would clear up the confusion. And Robert graciously did just that.
BREEZEBROWSER & DOWNLOADER PRO ON MACs by Robert Amoruso
For Apple/Mac users who have heard the praises of Breezebrowser/Downloader Pro sung for too long, or for PC users that are considering the switch to a MAC platform, salvation is at hand. With Apple’s introduction of the Intel-based Macs, you can now run Windows XP on a MAC using either Boot Camp or Parallels.
Boot Camp (http://www.apple.com/macosx/bootcamp/) is a utility written by Apple that will be in the upcoming MAC OS X 10.5 Leopard. It is, however, available now in a Beta version 1.1.2 that will run on MAC OS X 10.4.6 or later. With Boot Camp, you create a dual boot environment for your MAC by repartitioning the hard drive, creating a MAC drivers disk, and loading a full version copy of Windows XP/Service Pack 2 onto that newly created partition. Once that is done, holding down the Option key at startup brings up a dual boot selection window; you can choose either MAC or WINDOWS. You will need to download Boot Camp from the link above and purchase a new full version copy of Windows XP, Service Pack 2. I run Boot Camp on my Mac Book 13” without any problems. The only issue to date is that the touchpad is a bit twitchy; I believe that this is a driver problem, but since I am working with the Beta version I will have to wait for the final version to see if this minor problem is corrected. When using Apples' Mighty Mouse or a USB mouse, I have encountered no problems.
Your other option is a program called Parallels (http://www.parallels.com/en/) that allows Windows to run along side of MAC OS X in what is called a virtual machine environment. Parallels is more user friendly as you can go back and forth from XP to MAC and back. In Boot Camp, you have to reboot to change operating systems. I tried out Boot Camp on my laptop as Parallels would not work well on the more limited MacBook; but on a MacBook Pro or MacPro desktop, I think Parallels may be a better choice over Boot Camp. You would need to purchase a copy of Parallels; Boot Camp comes from Apple free. Using BreezeBrowser Pro and Downloader Pro on a MAC works great; there are no negatives. These two great programs operate just as well on a Mac platform as they do on a PC.
BOOT CAMPING the MAC
You can Download Boot Camp at http://www.apple.com/macosx/bootcamp/. You will also find the links to update the firmware and the Apple Tiger version to the latest (release 10.4.8) on this page. You can also download and print out the Installation instructions at http://images.apple.com/macosx/bootcamp/pdf/Boot_Camp_Beta_Setup_Guide_en.pdf.
Once the downloading and installation is complete, follow these simple steps to launch Windows:
1- Restart your computer and hold down the Option key until disk icons appear onscreen.
2- Select the startup disk you want to use and click the arrow beneath the icon.
This is also a simple setup. Both Windows XP and Vista are supported. The quick start guide can be downloaded at http://www.parallels.com/files/upload/Parallels%20Desktop%20for%20Mac%20Quick%20Start%20Guide.pdf. Once downloading and installation is complete, you do not have to reboot to switch as Windows XP or Vista will be running right on the MAC desktop.
With the advent of the Intel-Macs and the ability to run Windows on them, Chris Breeze has said that he will not be porting BBPro or DLPro to the Mac environment.
Robert Amoruso offers small group and personal instruction at various Florida locations. You can learn more about Robert and Wildscape Images here: http://www.wildscapeimages.com/
If you have any questions about Boot Camp or Parallels you can contact Robert via e-mail at this address: photo_rja@adelphia.net
Click here to learn more about or to order Breezebrowser Pro/Downloader Pro: http://www.birdsasart.com/breezebrowser.htm. Risk Free. Try before you buy. When you do decide to purchase there is no need to download the software again - simply place your order and then enter your registration code to unlock the software.
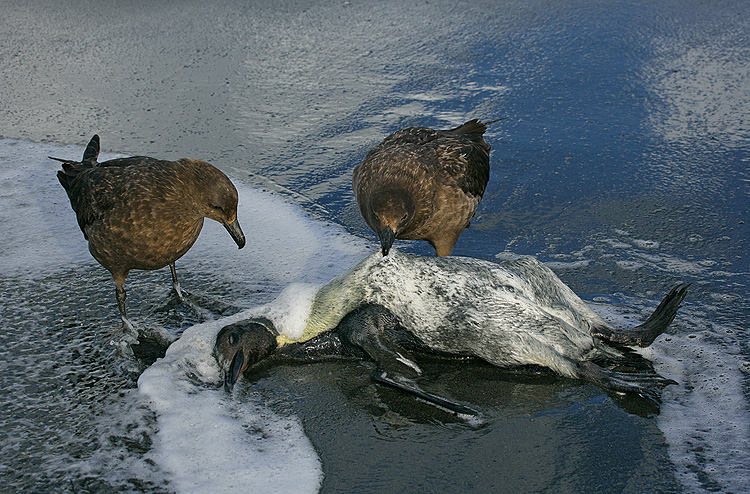
Brown Skuas scavenging immature King Penguin carcass, Gold Bay, South Georgia
Image Copyright 2007: Arthur Morris/BIRDS AS ART
Canon 100-400mm IS L lens handheld at 100mm with EOS-1Ds Mark II. ISO 400.
Evaluative Metering at zero: 1/640 sec. at f/11.
I had to keep backing up into the surf to stay far enough away to get everything into the frame; note the focal length… When struck unexpectedly by a large wave I was nearly knocked over and sucked backwards into the bay. Yikes!
CHRIS BREEZE'S TWO CENTS
I asked Chris Breeze to add his comments to Roberts. Here is his reply.
Downloader Pro and BreezeBrowser Pro work using both methods but...
Boot Camp:
This works fine as basically you're running a Windows XP system. It's fast and just like running any other Windows XP system. The only downsides are that the Mac keyboard and the single button mouse are a little inconvenient for running Windows and it takes time to shutdown Windows and reboot OS X when you want to switch operating systems.
Parallels:
This also works fine but is somewhat slower than Boot Camp. It has the convenience of running Windows in a separate window from within OS X and so it is very easy to switch from one to the other. The biggest problem is the USB drivers are only USB 1.1 and so downloading from a card reader is painfully slow i.e. a download takes up to 16 times longer than using USB 2.0. This is a complete show stopper as far as running Downloader Pro is concerned.
Boot Camp seems the better solution. It's faster and cheaper (you only need to have a copy of Windows XP whereas Parallels requires you to have a copy of Windows XP plus a copy of Parallels) but slightly less convenient.
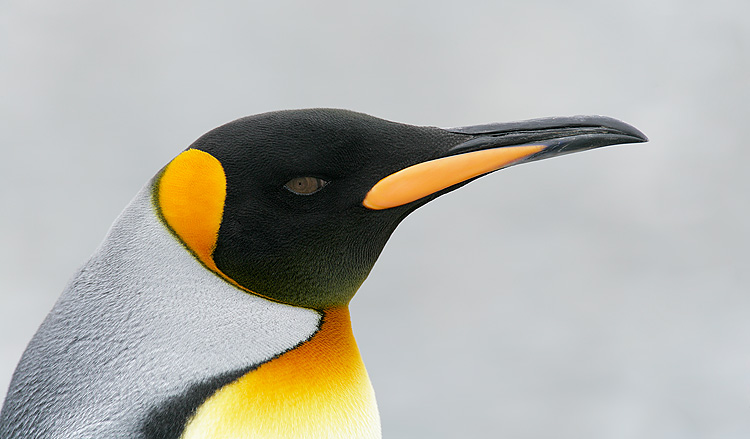
King Penguin, Salisbury Plains, South Georgia
Image Copyright 2007: Arthur Morris/BIRDS AS ART
Canon 500mm f/4 L IS lens with 1.4X II TC and EOS-1Ds Mark II. ISO 400.
Evaluative Metering +2/3 stop: 1/400 sec. at f/8.
Some folks suggested that I leave the 500mm lens at home but I am glad that I brought it. With the soft light and the light gray background I tried +2/3 stop and checked the histogram. Using techniques described in Digital Basics (http://www.birdsasart.com/digitalbasics.htm) I selected and lightened the eye.
DIGITAL BASICS FREEBIE/SETTING THE GRAY, WHITE, & BLACK POINTS
The great Photoshop tips below will appear in the next Digital Basics Update. I sort of knew about them before, but posse members Robert O’Toole (threshold, white point, & black point) and Robert Amoruso (gray point) refreshed my memory. These techniques can be used individually or in combination (usually setting both the black and the white points) depending on circumstances. They can be used to eliminate a color cast or to produce pure whites, pure blacks, and and/or pure grays. (Do note that although your mind-set may be to do either one or the other—that you are—in actuality, doing the same thing (at least in part).
Setting the Gray Point
Setting the gray point is one of the techniques that you can use to remove a blue (or other) cast from an image that has what should be a neutral gray tone in it. It is the simplest of the three techniques. Setting the gray point may yield pure whites and pure blacks as well.
First, do your basic Shadow/Highlight (if need be) and Levels Adjustments (as described in Digital Basics). Next, create a new Levels Adjustment layer by left clicking on the Create new fill or adjustment layer icon. You will find this icon, which looks like a black & white cookie, in the row of symbols along the bottom of the Layers Palette. Once the Levels Adjustment Window is open you will see three eye-droppers in the lower right corner. The middle eye-dropper is the Set Gray Point eye-dropper. Left-click on the middle eye-dropper and then left click on the area of the image that contains what you feel should be a neutral gray. When you left click on the gray, you will note that the color of the entire image will shift a bit. Click OK. If you are happy with the results, continue with the rest of your workflow. If the effect looks overdone, try reducing the opacity by varying degrees and see if you turn up anything that pleases you. If you do, then continue with your workflow. If not, go back to the last history state before the 2nd Levels Adjustment layer and try a different approach. (Several others are already covered in Digital Basics).
Setting the White Point/The Easy Way
Setting the white point can remove a color cast (often cyan or magenta) in the white tones. Setting both the white and black points should yield a totally color-neutral image. Do note that in some situations like sunrise, sunset, early morning, and late afternoon you may or may not want an image with totally neutral color. Unwanted color casts occur most often in images made in cloudy conditions or in those made in the shade <smile>
To set the white point, you must first find and note the area of whitest white in your image. To do this, use the Threshold trick. First, open a Threshold Adjustment layer by left clicking on the Create new fill or adjustment layer icon. As before, you will find this icon, which looks like a black & white cookie, in the row of symbols along the bottom of the Layers Palette. Next left click on “Threshold.” A Threshold window will appear and your image will have been transformed into stark black and white. To find the whitest whites, move the slider to the right until only a small, solid area of white remains in a field of black. Then shift-click on this spot. This will create a small circular target type of symbol alongside the number 1. Now click on cancel! (You simply wanted to make the area of brightest white identifiable and you have done so.) The image will return to its previous (normal-looking appearance) with the exception that you will see the number 1 and the small symbol on your image. Not to worry, it will disappear once the image is saved.
You are now ready to set the white point. Again, as you did when setting the gray point, create a new Levels Adjustment layer. In the lower right hand corner you will see the three eye-droppers. The right-hand eye-dropper is the Set White Point eye-dropper. Left-click on this eye-dropper and then left-click exactly on the circular target type symbol adjacent to the number 1 on your image. When you left click on this spot you will usually note a slight shift in the colors of the entire image. In all cases, your whites should be rendered pure white with equal (high) amounts of R, G, &B. Click OK. If you are happy with the results, continue with the rest of your workflow. If the effect looks overdone or you are not completely happy with the newly rendered colors, try reducing the opacity by varying degrees and see if you turn up something that pleases you. If you do, just continue on with your workflow. If not, go back the last history state before the 2nd Levels Adjustment layer and try a different approach. (Several others are already covered in Digital Basics). Though this sounds a bit complicated on the first reading, with a bit of practice you will find that it is a fast simple procedure that usually takes a minute or two at most.
Setting the Black Point/The Easy Way
Setting the black point can be used to remove a color cast (often cyan, green, or magenta) from the black tones. As above, setting both the white and black points should yield an image with totally neutral color. (Do note that in some situations like sunrise, sunset, early morning, and late afternoon you may or may not want an image with totally neutral color.) Unwanted color casts occur most often in images made in cloudy conditions or in those made in the shade <smile>
To set the black point, you must first find and note the area of blackest black in the image. To do this, use the Threshold trick. First, open a Threshold Adjustment layer by left clicking on the Create new fill or adjustment layer icon. As before, you will find this icon, which looks like a black & white cookie, in the row of symbols along the bottom of the Layers Palette. Next left click on “Threshold.” A Threshold window will appear and your image is transformed into stark black and white. To find the blackest blacks, move the slider to the left until only a small, solid area of black remains in a field of white. Then shift-click on this area. This will create a small circular target type of symbol alongside the number 1. Now click on cancel! (You simply wanted to make the area of darkest black identifiable and you have done so.) The image will return to its previous (normal-looking appearance) with the exception that you will see the number 1 and the small symbol on your image. Not to worry, it will disappear once the image is saved. (Note: If you have previously found the whitest white in the same Levels window, the blackest black point will be assigned the number 2.)
You are now ready to set the black point. Again, as you did previously, create a new Levels Adjustment layer. In the lower right hand corner you will see the three eye-droppers. The left-hand eye-dropper is the Set Black Point eye-dropper. Left click on this eye-dropper and then left click exactly on the circular target type symbol adjacent to the number 1 on your image. When you left click on this spot you will usually note a slight shift in the colors of the entire image. In all cases, your blackest blacks should be rendered pure black with equal (low) amounts of R, G, &B. Click OK. If you are happy with the results, continue on with the rest of your workflow. If the effect looks overdone or you are not completely happy with the newly rendered colors, try reducing the opacity by varying degrees and see if you turn up anything that pleases you. If you do, just continue on with your workflow. If not, go back to the last history state before the 2nd Levels Adjustment layer and try a different approach. (Several others are already covered in Digital Basics). Though this sounds a bit complicated on the first reading, with a bit of practice you will find that it is a fast simple procedure that usually takes a minute or two at most.
You can learn more about or order your copy of Digital Basics here: http://www.birdsasart.com/digitalbasics.htm
-Petrels-flock-in-flight-_MG_0183-Drake-Passage,-Antarctica.jpg)
Pintado (Cape) Petrels, Drake Passage, Southern Ocean
Image Copyright 2007: Arthur Morris/BIRDS AS ART
Canon 100-400mm IS L lens handheld at 400mm with EOS-1D Mark IIN. ISO 400.
Evaluative Metering +2 1/3 stops off of white sky set manually: 1/1250 sec. at f/5.6.
I had been photographing off of the ship’s rear deck with the handheld 500mm lens when flocks of these elegant petrels appeared around the boat; I quickly ran down to my cabin to grabbed the 100-400mm zoom so that I could be better frame the flocks. I love the painterly look of this image.
DIGITAL BASICS KUDOS
Below is an
e-mail that I received from Frank Harrison of
Australia.
Dear Artie, I think
it is important to state from the off to state that though I am a proficient,
award winning photographer, I am a computer-phobe of the highest order. In
short, I love the camera side of digital but loathe the computer side & on face
value it seemed that purchasing your Digital Basics File would be little value
to me. I use Photoshop Elements 3 on an Apple Macintosh platform & live in a
relatively remote part of northern
Australia where support & backup for cutting edge computer/ photography
advancement is zero. This of course means I cannot use Breezebrowser plus
some of the tools & procedures that you use in CS2.
After purchasing several
expensive books & spending months being totally fazed & frustrated by
gobbledygook my health began to suffer. I could not sleep and
experienced migraine headaches & panic attacks. I swear there were times when I
heard the computer in the corner issue an evil cackle as I passed, even though
it was turned off. My eczema became intolerable, the level of the scotch bottle
sank faster than it should, & my wife began to worry when I started taking long
looks at her rack of sharp knives in the kitchen! Then one night I sat down at
the computer, possibly to pen my "farewell" letter but decided first to take one
final look at the BIRDS AS ART web site. My eyes immediately fell on your
Digital Basics File; I felt a gust of calm come over me & looked down to see my
trembling fingers ordering the PDF.
My life was turned
around in an instant. The text was actually written by a human being for human
beings & was easy to understand & to follow. Tasks that previously filled me
with fear & dread now became fun & enjoyable & could be performed in a fraction
of the time. While the disadvantages of my platform & software options are
certainly there, they are insignificant compared to the wealth of usable savvy
which percolates off every page. Even if I only pick up one tip per page, for
the modest sum I spent on the DBF (& I am renowned for flinging my money around
like Scrooge in a straitjacket) it still works out at only mere cents per gem of
information. Artie, I cannot recommend Digital Basics highly enough; thank you
so much for the return of my life & for a saved fortune in psychiatric bills!
Regards, Frank Harrison (Your man down under)
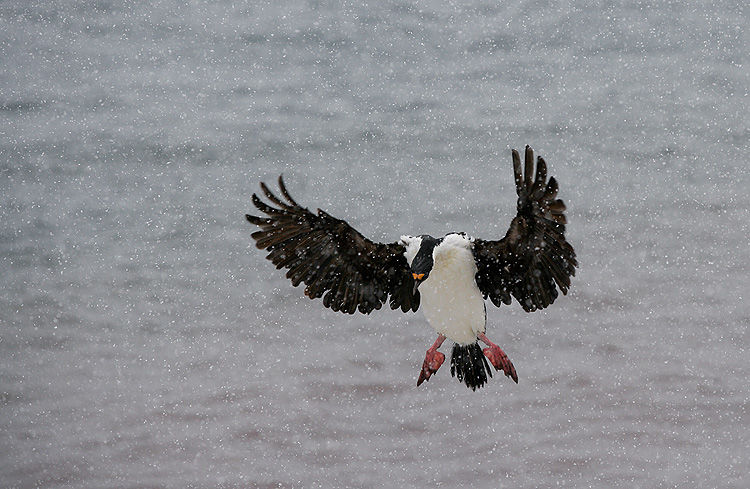
Blue-eyed Shag landing in snowstorm, Paulet Island, Antarctica
Image Copyright 2007: Arthur Morris/BIRDS AS ART
Canon 100-400mm IS L lens handheld at 200mm with EOS-1Ds Mark II. ISO 400.
Evaluative Metering +2 1/3 stops off of white sky set manually: 1/1250 sec. at f/5.6.
When using an intermediate zoom lens for flight it is usually best to zoom wider and avoid clipping the wing tips frame after frame while trying for a full frame image.
BAA & BULLETIN KUDOS
Hi Artie,
I’m sending this email to thank you for the continuous help and inspiration that you provide through your bulletins. I anxiously look forward to each new edition. The images you generously share are always incredible, and equally important are your trademark legendary educational captions. Inspiration and education! I thoroughly enjoy your trip reports and through your writing and images I get a good feel for the location, what it takes to capture the image and a benchmark to aspire to. The only thing that compares and exceeds the bulletin is being part of an IPT. I attended last year’s Alligator Farm IPT and the experience, images and learning exceeded all of my expectations. I’m planning to attend another IPT in the second half of this year. Thank you for your generosity.
Marc Schoenholz
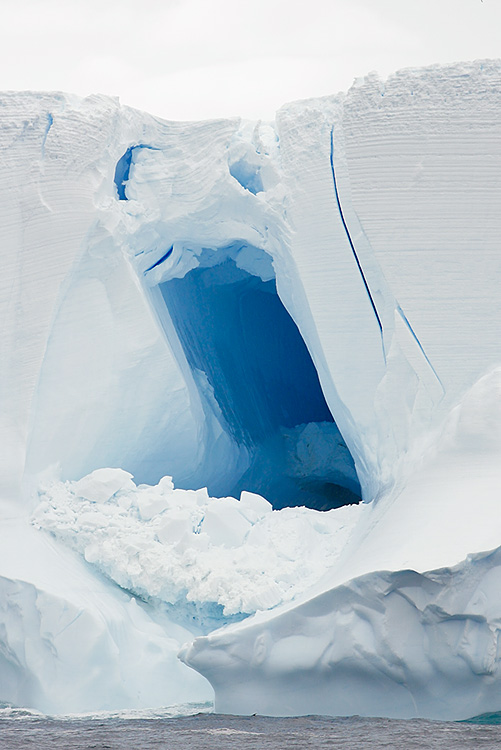
Screaming Meanie” Iceberg, South Orkney Islands
Image Copyright 2007: Arthur Morris/BIRDS AS ART
Canon 100-400mm IS L lens handheld at 400mm with EOS-1D Mark IIN. ISO 400.
Evaluative Metering +1 1/3 stops: 1/250 sec. at f/5.6 set manually.
This image was made from the ship as the captain circled an attractive iceberg. Many photographers saw this structure without photographing it, without seeing the screaming meanie face. Can I teach you to see stuff like this? I am not sure, but I try in the chapter called Advanced Composition and Image Design in ABP II: http://www.birdsasart.com/ABPII.htm
THE TWO NEW IPTs:
Fort DeSoto IPT: APR 17-19, 2007. Slide program on the evening of Monday, APR 16. 3-DAY: $999 Limit 14; openings 11. Co-leaders Alfred Forns and Robert O’Toole. Courtship and breeding behaviors of Laughing Gull and Royal and Sandwich Terns. Herons, egrets (including both dark and light phase Reddish Egret), shorebirds (including Long-billed Curlew), gulls, terns, and skimmers among others.
As many folks have asked about a 2007 St. Augustine Alligator Farm IPT, I am offering the following:
St Augustine Alligator Farm MAY 17-20, 2006. 3 1/2 DAY IPT: $1099 (Limit: 12, openings: 8). Introductory Slide Program from 2-4pm on the afternoon of Thursday, May 17. This IPT includes 7 photography sessions and four slide programs, with at least two devoted totally to Photoshop. Amazing heron and egret rookery. Nesting Great, Snowy & Cattle Egrets and Tricolored Herons, all with chicks.
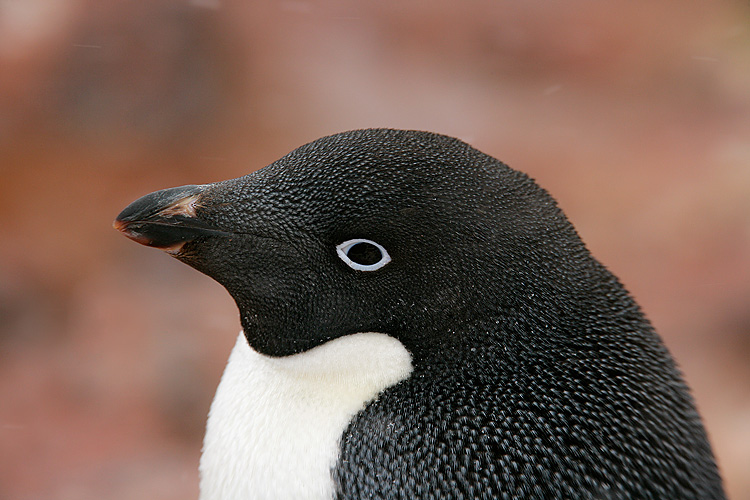
Adelie Penguin, Brown Bluff, Antarctica
Image Copyright 2007: Arthur Morris/BIRDS AS ART
Canon 500mm f/4 L IS lens with 1.4X II TC and OS-1Ds Mark II. ISO 400.
Evaluative Metering +1/3 stop set manually: 1/640 sec. at f/8.
The guano in the Adelie rookeries did not have a pleasant odor at all and most folks did not enjoy sloshing through the pink slush, but the guano sure provided a lovely background in the soft light…
NYC SEMINAR
Amazingly, we have already registered 44 folks for this event. There is a great possibility that this event will sell out well in advance. We can comfortably entertain 125 folks…
The Art of Nature Photography; It Ain’t Just Birds!
Weekend How-To Seminar
Queens, New York (near JFK Airport)
August 18-19, 2007
The cost of the weekend seminar will be $169. The cost of either single day will be $99. Members of qualifying camera clubs are invited to apply a $10 discount. (If you are a member of a camera club or other photography organization please e-mail for details.) Register with a friend or spouse and take $10 off each registration. Register in groups of four or more and take $20 off of each registration. Get a group of ten photographers together and apply a $30 discount to each registration. (Please e-mail for group registration details.) It is highly recommend that folks purchase the buffet luncheon option ($15/day includes tip and tax) as there are no fast food restaurants nearby. Those purchasing the lunch option will receive their lunch coupon when they check in each morning.) The cost of the weekend seminar plus the two lunches is $199.
To register, send a check for the full amount made out to "Arthur Morris" to PO Box 7245, Indian Lake Estates, FL 33855, call with a credit card: 863-692-0906, or send a Paypal (using either any link on our site or your Paypal account) to us at birdsasart@att.net In all cases, we will need your e-mail address, your mailing address, and your daytime and evening phone numbers. Here is our Cancellation Policy: If for any reason you need to withdraw, please notify us ASAP. Once we receive your e-mail, phone call, or written notice of your cancellation the following fees apply: cancel before May 17, 2007 and your fee will be refunded less a $20.00 cancellation fee; cancel by July 17, 2007 and your fee will be refunded less a $50.00 cancellation fee; cancel after July 17, 2007 and there will be no refund.
The doors will open on both days at 8 am and the programs will begin at 9 am sharp. There will be tons of great door prizes. I hope that you will be able to join me for what will be an incredibly educational and fun-filled weekend. (If anyone would like to help us set up or to simply hang out, be there at 7:00am.)
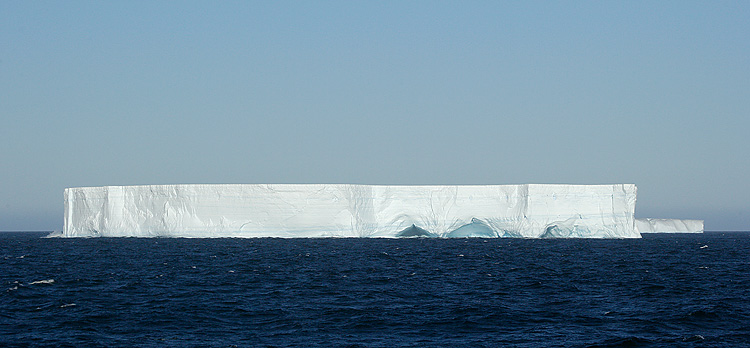
Tabular Iceberg, near Elephant Island
Image Copyright 2007: Arthur Morris/BIRDS AS ART
Canon 100-400mm IS L lens handheld at 150mm with EOS-1D Mark IIN. ISO 250.
Evaluative Metering -1/3 stop: 1/3200 sec. at f/8.
With the bright sun, a 1/3 stop underexposure was needed to prevent underexposing the whites. For more than 15 years I have been teaching folks that in bright sun with bright white against middle to use -1/3 stop compensation and that holds true for both film and digital. Do note that most Nikon cameras as well as the Canon 10D, 20D, and 30D all need about 1/3 stop less light than my Canon professional bodies; with any of them the correct compensation in similar situations would be -2/3 stop. It is—of course—always best to make one image and then check the histogram. And remember, it ain’t just birds!
EVERGLADES NATIONAL PARK IN-THE FIELD WORKSHOPS
The Saturday February 24, 2007 In-The-Field Workshop ($275 per person) is sold out with a waiting list. I am offering a second day of in-the-field instruction on Sunday February 25: Morning photo session at Shark Valley, afternoon photo session at Anhinga Trail. (Limit 12). To register, please send a check (made out to Arthur Morris) for payment in full to us at Arthur Morris/BIRDS AS ART, PO Box 7245, Indian Lake Estates, FL 33855. Paypals and phone credit cards payment are OK. Please be sure to include all contact info including home, work and cell numbers and most importantly, your e-mail address. Hope that you can join us.
NEW! Shark Valley/Anhinga Trail In-The-Field Workshop: Sunday February 25, 2007. $275. (Morning—Shark Valley, and afternoon—Anhinga Trail photo sessions.) $275 per person (Limit 12) Co-leaders Alfred Forns & Robert Amoruso. Join me for a rare east coast workshop at Everglades National Park. There will be tons of tame subjects and lots of great in-the-field instruction.
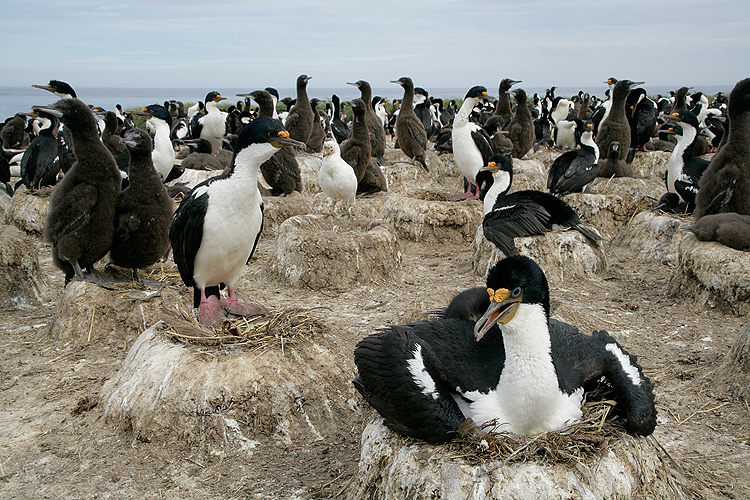
Imperial Cormorant (Shag) rookery, Bleaker Island, Falklands
Image Copyright 2007: Arthur Morris/BIRDS AS ART
Canon 24-105mm IS L zoom lens handheld at 40mm with the EOS-1Ds Mark II. ISO 400.
Evaluative Metering at zero: 1/125 sec. at f/22.
To create an image like this I use One-Shot AF, focus on the subject bird (which also served here as the compositional anchor), recomposed, and made the image (while using lots of depth-of-field). .
IPT UPDATES
SW FLA President's Holiday IPT: FEB 17-21, 2007. Slide program on the evening Friday, FEB 16, 2007. 5-DAY: $1649. (Limit 14; Sold out; wait list only.) Co-leaders: Robert O’Toole, Alfred Forns, & Robert Amoruso. Sanibel Island, Little Estero Lagoon, Venice Rookery, Cape Coral. Herons, egrets, gulls, terns, skimmers, shorebirds, both pelicans, Osprey, Burrowing Owl, and lots more.
Anhinga Trail In-The-Field Workshop: Saturday, February 24, 2007. $275. (Morning and afternoon photo sessions.) $275 per person (Sold out) Co-leaders Alfred Forns & Robert Amoruso. Join me for a rare east coast workshop at Everglades National Park. There will be tons of tame subjects and lots of great in-the-field instruction.
NEW! Shark Valley/Anhinga Trail In-The-Field Workshop: Sunday February 25, 2007. $275. (Morning—Shark Valley, and afternoon—Anhinga Trail photo sessions.) $275 per person (Limit 12; 3 openings) Co-leaders Alfred Forns & Robert Amoruso. Join me for a rare east coast workshop at Everglades National Park. There will be tons of tame subjects and lots of great in-the-field instruction.
Fort DeSoto IPT: APR 13-15, 2007. Slide program on the evening of Thursday, APR 12. 3-DAY: $999 Limit 14, openings: 1) Co-leaders: Robert O’Toole, Alfred Forns, & Robert Amoruso. Courtship and breeding behaviors of Laughing Gull and Royal and Sandwich Terns. Herons, egrets (including both dark and light phase Reddish Egret), shorebirds (including Long-billed Curlew), gulls, terns, and skimmers among others.
NEW! Fort DeSoto IPT: APR 17-19, 2007. Slide program on the evening of Monday, APR 16. 3-DAY: $999 Limit 14 openings 11). Co-leaders: Alfred Forns and Robert O’Toole. Courtship and breeding behaviors of Laughing Gull and Royal and Sandwich Terns. Herons, egrets (including both dark and light phase Reddish Egret), shorebirds (including Long-billed Curlew), gulls, terns, and skimmers among others.
NEW! St Augustine Alligator Farm MAY 17-20, 2007. 3 1/2 DAY IPT: $1099 (Limit: 12; openings 8). Introductory Slide Program from 2-4pm on the afternoon of Thursday, May 17. This IPT includes 7 photography sessions and four slide programs, with at least two devoted totally to Photoshop. AMAZING HERON AND EGRET ROOKERY. NESTING GREAT, SNOWY & CATTLE EGRETS AND TRICOLORED HERONS WITH CHICKS.
Silver Salmon Creek: August 8-14, 2007. Coastal Brown Bears catching salmon, Horned Puffins, macro, scenics, and fishing (optional): $4999. (Limit 12: openings: 1; we need either a single female or a male, the latter most likely in a cabin) Three leaders, two TBA (plus me <smile>).
Bosque #1: "The Fall Color IPT" NOV 13-15, 2007. Slide Program on the evening of NOV 12. 3-DAY: $999. Limit 14; openings: 12). Co-leader: Robert O'Toole. This IPT should feature a better chance for a day or two of the rare south winds that drastically improve flight photography and will definitely feature the brightest fall-color cottonwoods.
Bosque #2: "The Pre-Thanksgiving IPT" NOV 18-20, 2007. Slide Program on the evening of NOV 17. 3-DAY: $999. Limit 14; openings: 13). Co-leaders: Robert O'Toole & Alfred Forns. This IPT will feature increasing numbers of geese and cranes with lots of great opportunities. In 2007, I will again be hosting a Thanksgiving Day luncheon at Las Lunas Mansion, a fine restaurant in an historic building. You will need to reserve a spot and pay in advance. Details TBA; strictly limited to 50 folks.
Bosque #3: "The Post-Thanksgiving IPT" NOV 24-26, 2007. Slide Program on the evening of NOV 23. 3-DAY: $999. (Limit 14: 1 slot open) Assistant leaders: Robert O'Toole and Alfred Forns. This IPT is scheduled on dates that I consider peak for Bosque. (There may be a Full Moon Add-on NOV 23; details TBA. If you register for this one, hold off on buying your plane ticket if you might be interested in the add-on.) In 2007, I will again be hosting a Thanksgiving Day luncheon at Las Lunas Mansion, a fine restaurant in an historic building. You will need to reserve a spot and pay in advance. Details TBA; strictly limited to 50 folks.
SW FLA Post X-mas IPT: DEC 27-29, 2007. Slide program on the evening Wednesday, DEC 26, 2007. 3-DAY: $1029. (Limit 14) Co-leaders: Alfred Forns, & Robert Amoruso. Sanibel Island, Venice Rookery, Cape Coral, and possibly Little Estero Lagoon (depending on the tides). Herons, egrets, gulls, terns, skimmers, shorebirds, both pelicans, Osprey, Burrowing Owl, and lots more. Roseate Spoonbill and Wood Stork possible.
Best and love and great picture-making to all,
artie
Note: Arthur Morris has been a Canon contract photographer since 1994 and continues in that role today. Hunt's Photo of Boston, MA is a BAA sponsor as it Delkin Devices. Back issues of all BAA Bulletins can be found in the Bulletin Archives which may be accessed from the home page at www.birdsasart.com