BIRDS AS ART BULLETIN #278
Please give the
images a minute or two to load and do make sure that your security settings
LINDA ROBBINS’ HUMMINGBIRD IMAGES FROM COSTA RICA
The Hummingbird Guide – How to Photograph Hummingbirds Using High-Speed Multiple Flash by LINDA ROBBINS with Arthur Morris
The Hummingbird Guide INCLUDES FREE UPDATES VIA E-MAIL
HUMMINGBIRD GUIDE KUDOS
NIKON AF COMMENTS FROM JAMES SHADLE
HUNT’S PHOTO KUDOS
KUDOS ALL AROUND
LEPP INSTITUTE PROGRAMS
Contact us by phone at 863-692-0906 (Eastern Time Zone) or by e-mail at birdsasart@att.net or birdsasart@verizon.net. The att e-mail address is best from overseas.
Photographic theme:
hummingbird images from her recent trip to Costa Rica by Linda Robbins.
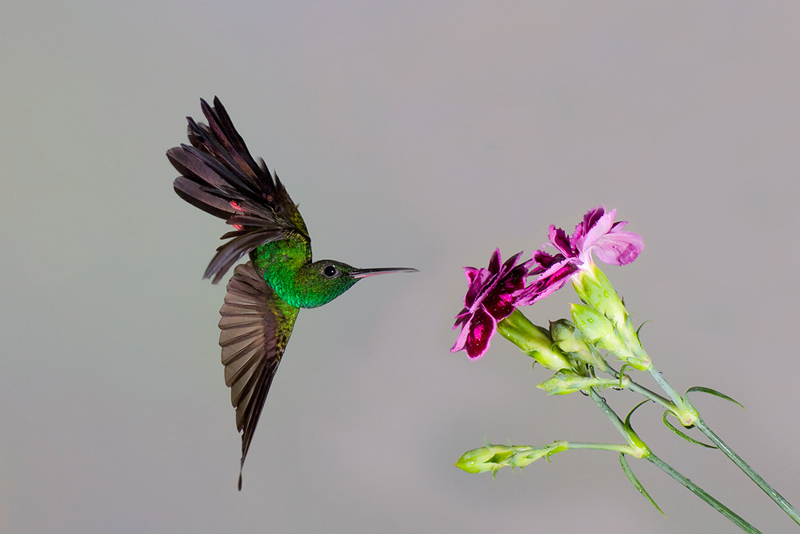
Red-footed Plumeleteer, male at flower, Rancho
Image copyright 2008: Linda Robbins/Hummingbird Addiction
Canon EOS 1D Mark IIN and a Canon 400mm f/4 IS DO lens. Gitzo 3530 LS tripod and Wimberley V2 head. ISO 400. Manual exposure. 1/250 at f/18. Eight flash set-up and an artificial background.
With practice you will become more skilled at capturing interesting flight poses such as dives, reverses, and turns. As you watch the different hummingbirds visiting the feeder or flowers at your set-up, you will learn to anticipate how each species will most likely approach or leave the set and you will be ready to fire a burst of shots at the most optimal moment.
LINDA ROBBINS’ HUMMINGBIRD IMAGES FROM COSTA RICA
Linda Robbins is addicted to hummingbirds. With the help of from her friend Rich Garrett, information gleaned from Ralph Paonessa’s web site, and tips from a pamphlet by John and Barbara Gerlach, she learned the basics of high speed flash hummingbird photography. Then she improved upon what she had already learned. Next she experimented a ton and honed her set-up skills. On each trip she learns something new. When I saw the images from her recent trip to Costa Rica, her continued improvement was evident. And she was already pretty much the best. I am proud to share just of few of those images with you here. Thanks to Linda for permitting me to share her work with you and for preparing the captions.
If you would like to learn Linda’s techniques, do check out Item 2 below.
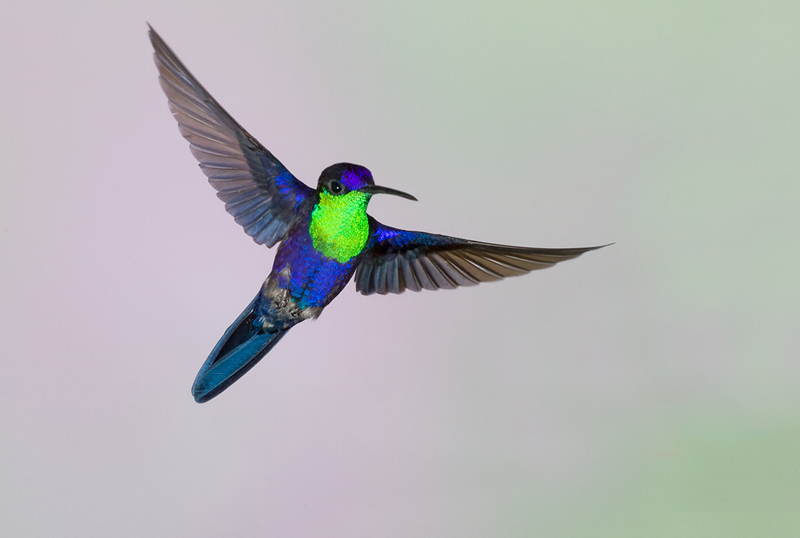
Crowned
Woodnymph male, Rancho
Image copyright 2008: Linda Robbins/Hummingbird Addiction
Canon EOS 1D Mark IIN and a Canon 400mm f/4 IS DO lens. Gitzo 3530 LS tripod and Wimberley V2 head. ISO 400. Manual exposure. 1/250 at f/20. Eight flash set-up and an artificial background.
(From the Hummingbird Guide): “Angle the feeder tube or the open port of the feeder at your set-up somewhat towards the rear and the birds will hover facing the camera so that you can obtain good head angles and frontal poses.”
The Hummingbird Guide – How to Photograph Hummingbirds Using High-Speed Multiple Flash by LINDA ROBBINS with Arthur Morris
Linda began work on this guide in late 2007 and promised that it would be finished by February 1, 2008… As you might guess, it turned out to be a lot more work than Linda envisioned. It is, however, very much worth waiting for.
There is a smattering of information available on line and in various books and publications, but never before has everything that you need to know to get started in this highly specialized field of photography been assembled in one place in a pleasingly designed, easy-to-read format. The guide is comprehensive in its scope; among the topics covered are choosing cameras and lenses, suitable tripods and tripod heads, choosing and purchasing suitable flashes, the needed equipment (flash stands, articulated arms, mini ball heads, etc.), choosing and setting up your feeder(s), how to create your artificial backgrounds, detailed, step-by-step instructions on setting up including flash and background placement, determining the right exposure, an explanation of the flash theory involved in high speed flash hummingbird photography, helpful odds and ends, digital and Photoshop considerations, the best rechargeable batteries and battery chargers, dealing with ants, bees and wasps at the set-up, dealing with the guarding birds that keep all others away from the set-up, the best photographic strategies including focus-acquisition tips, introducing perches to the set-up, and selecting flowers and adding them to the set-up. In addition, Linda writes eloquently on the topic of becoming addicted to high speed flash hummingbird photography (consider yourself fore-warned). Also included is an informative section entitled “About Hummingbirds.” Photographing perched hummers, creating pleasingly blurred images, and using macro lenses for hummingbird head-portraits are dealt with in photo-illustrated gallery format.
The section on needed equipment is especially impressive as Linda does a thorough job of exploring the variously priced options and lets you know exactly what she is using at present. The book is lavishly illustrated with both of our images (most of them, and all of the very best, are Linda’s.)
In truth, I cannot say enough in praise of this great new work. Linda is a skilled photographer and her hummingbird images are among the best you will see anywhere. And Linda is a skilled writer. I enjoyed both editing her words and authoring a section or two for the guide. Your purchase will include periodic free updates via e-mail PDF files.
You can order your copy of “The Hummingbird Guide – How to Photograph Hummingbirds Using High-Speed Multiple Flash” (on CD only) today for $50 plus $3 shipping and handling ($53 total) in the US. Florida residents need to add 7% sales tax: $53.50 plus the $3 shipping and handling ($56.50 total). To Canada the cost is $50 plus $6 shipping ($56 total). For overseas customers the cost will be $50 plus $8 shipping and handling ($58 total). A check made out to “Arthur Morris” and sent to us at BIRDS AS ART, PO Box 7245, Indian Lake Estates, FL 33855 is fine. As is a Paypal payment. Or, call us at 863-692-0906 with credit card in hand.
Whether you are just thinking about getting started in this field or have been doing it for years, there is tons for you to learn from Linda’s great new guide. We are proud to add it to the BIRDS AS ART information-in-digital-form line-up. Even better news for folks who can never envision spending big bucks on a flash set-up and traveling overseas with all that gear: Linda will be leading several high speed flash hummer trips to various South and Central American hotspots. All you need to do is bring a camera, lens, tripod, and tripod head and show up. Linda will have everything else that you need. Two photographers per set-up. For info write Linda at lindaasart@aol.com
Lastly, BAA Mail Order will be carrying most of the specialty items that you need to get started; details to follow.
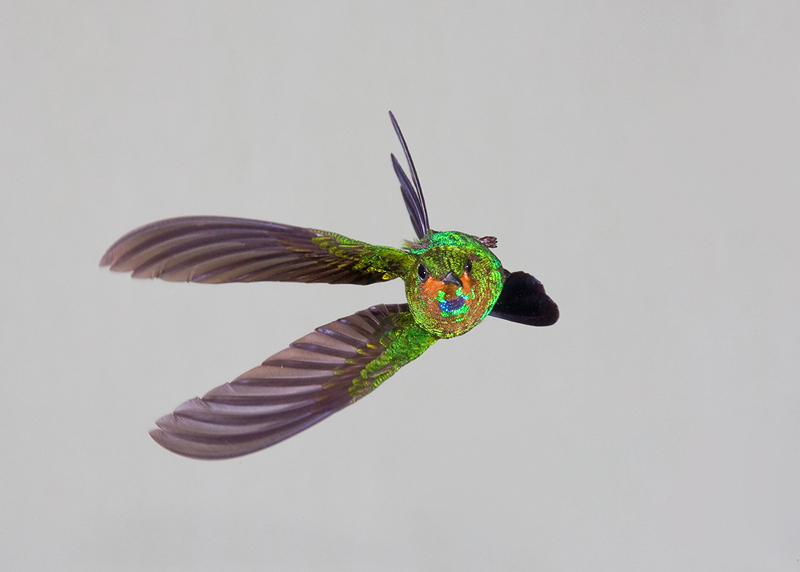
Green-crowned brilliant, juvenile male, Rancho
Image copyright 2008: Linda Robbins/Hummingbird Addiction
Canon EOS 1D Mark IIN and a Canon 400mm f/4 IS DO lens. Gitzo 3530 LS tripod and Wimberley V2 head. ISO 400. Manual exposure. 1/250 sec. at f/22. Eight flash set-up with an artificial background.
Hummingbirds have amazing flight capabilities. They can hover, back up, and even fly upside down. And they can fly at speeds up to 93 m.p.h.! These tiny marvels of flight are powered by having the most flight muscle per unit mass of any bird. The only way to truly appreciate the beauty and dexterity of hummingbird flight is to freeze the moment with high-speed multiple flashes.
The Hummingbird Guide INCLUDES FREE UPDATES VIA E-MAIL
Until we firmed up the logistics, we were reluctant to announce when the first free update to Linda Robbins’ Hummingbird Photography Guide would be sent. Now that we have the logistics down pat we are glad to be able to let you know that the first e-mail update will be sent in mid-December. On her Costa Rica trip, Linda figured out what causes shadows of the feeder and/or the birds to appear on the background. This is only some of the info that she will share with you in the first update.
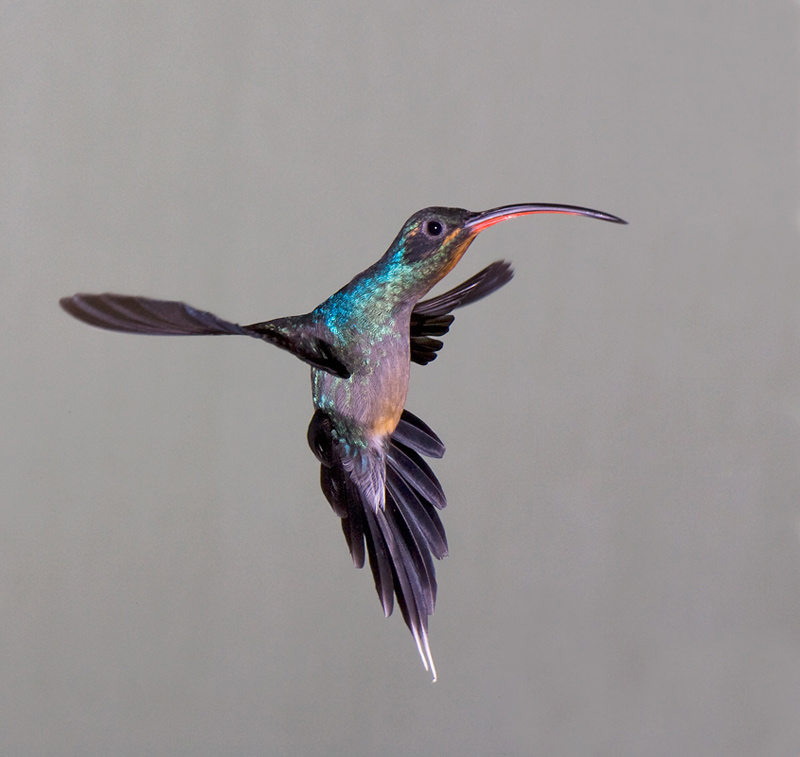
Green
Hermit, male, Rancho
Image copyright 2008: Linda Robbins/Hummingbird Addiction
Canon EOS 1D Mark IIN and a Canon 400mm f/4 IS DO lens. Gitzo 3530 LS tripod and Wimberley V2 head. ISO 400. Manual exposure. 1/250 sec. at f/18. Eight flash set-up with an artificial background.
Green Hermit males are such exotic-looking hummingbirds. Hummingbirds will flare their tails to appear larger when they are trying to intimidate another hummingbird near the feeder. This bird was moving very fast. The remote flashes at the set-up were set to 1/32 power which gave me a flash duration of about 1/12,000th of a second, and even this blazing speed was not fast enough to completely freeze the wingtips.
HUMMINGBIRD GUIDE KUDOS
From Melvin Grey by e-mail:
The design of Linda’s Hummingbird Guide is very attractive with excellent and relevant images throughout, thus giving one great incentive to 'get up and have a go'. Linda's fascination and love of her subjects shines through in her simple to read and informative text. The recommendations about equipment, the reasoning behind the choices, and her descriptions of creating the set up are straight forward and easy to understand. Obviously this pre-supposes a certain knowledge of bird photography and digital photography techniques, but then humming birds are hardly a beginner's subject. Although the number of flashes and the amount of extra equipment needed might sound a little daunting, simpler successful set-ups are indicated and encouragement is given to experiment (Artie’s techniques for introducing slight blur to the wings for example). With the inclusion of what can be done in Photoshop and the list of 'useful odds and ends' this is altogether a complete, concise informative introduction to a fascinating branch of photography I intend trying next year. It is beautifully laid out and well worth the money.
I have re-sized and printed out the pages and covered and bound them to make a book. I appreciate that putting it out on a CD was the only way to make it a viable proposition, but I am 'old school' enough to love and appreciate books and, in my opinion, there is nothing like having a well printed book to be able to pick up and look at, whenever you want to refer to something. Incidentally this is something I am doing with your ABP II; in this case by creating several volumes of the various chapters! Thanks for all your help, Melvin
Here is an e-mail exchange that I had with Jeff Rugg:
AM: Hi Jeff, It is good to hear from you; thanks for taking the time to write.
re:
JR: I have been meaning to write for a long time to tell you how much I appreciate your email bulletins and your CDs. The information that you share obviously come from a generous heart.
AM: Thanks for your kind words. It is always nice to hear them.
JR: I ordered Linda’s Hummingbird Guide as soon as it was available because I am in northern Illinois and there was a hummingbird at my feeder. I only get hummingbirds at my house for a couple of weeks during the fall migration, so I had to act fast. The CD came quickly. The hummingbird left within a week of getting the CD, so I didn’t have much time to try things out. The first picture shows one of my best hummingbird pictures that I took before the CD arrived. In many others, the wings don’t exist, or are just a blur, (which—as you say in the guide—can at times be a nice effect). My yard is covered in tree canopy with only a few shafts of light coming down on the feeder in the afternoon so I could get a ‘fast’ shutter speed of 1/500 of a second at f/5.6 with my 100-400 lens on a Canon 30D. I only have two flash units so second photo needs another one on the background and from the left, but the action is finally stopped. Interestingly, the shutter speed is only 1/160 at f/8.
AM: Thanks for sharing your images. The second one is certainly a big improvement especially with regards to the no longer black background. Most importantly, you need to re-read the section on getting the exposure right by checking the histogram. The neck of the bird in your second image has over-exposed pixels. Second, use the section on Photoshop techniques to learn to eliminate the feeder from your images. Third, I agree that adding two more flashes to your set-up would be a great idea but I would use them both on the bird as the background in your second image (that was lit by a single flash) looked fine.
JR: I am very happy with the results, so far. And now I now know what other things I need to do to get better hummingbird images next year. Thank you again for all your effort in helping the rest of us become better photographers and observers of nature. Jeff
AM: You are most welcome. Thanks again for your kind words, and later and love, artie
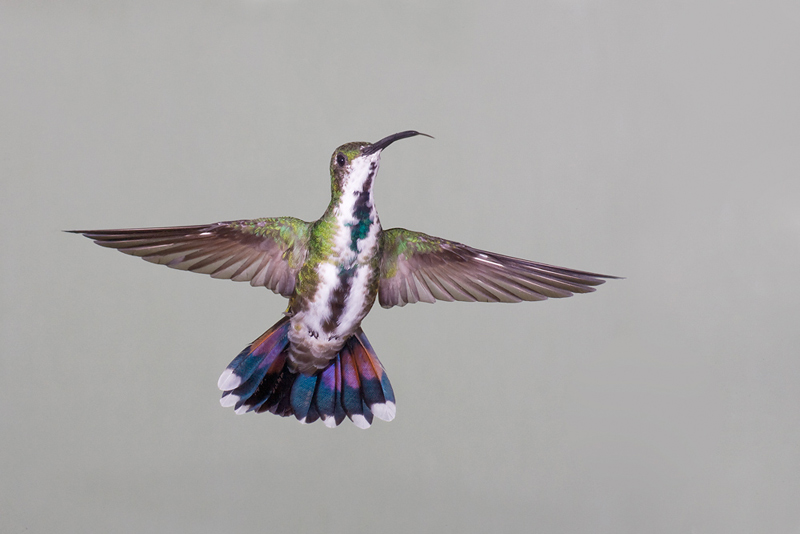
Green-breasted Mango, female, Rancho
Image copyright 2008: Linda Robbins/Hummingbird Addiction
Canon EOS 1D Mark IIN and a Canon 400mm f/4 IS DO lens. Gitzo 3530 LS tripod and Wimberley V2 head. ISO 400. Manual exposure. 1/250 sec. at f/20. Eight flash set-up with an artificial background.
In most species of hummingbirds, the males are more colorful and more beautiful than the drabber females. The female Green Mango female is, however, a stunningly beautiful bird by any standard.
NIKON AF COMMENTS FROM JAMES SHADLE
James Shadle,
our Nikon Answer Man, received this e-mail from Dave Klein:
My name is Dave Klein and I have been a
long-time Nikon shooter. Ironically I will be at Bosque del Apache from Nov.
21-25 as a personal sojourn and early celebration of my upcoming 50th
birthday. I am wondering and asking (respectfully) if you have opinions about
AF camera body settings for Nikon bodies relative to avian flight
photography. My current tandem is the D2Xs and D300 (with MB-D10) and my
prime lens is the Nikon 200-400 AF-S VR with the 1.4X/1.7X TCs as needed. I
have not yet acquired the SB-900 but have 2 SB-800s with flash extenders as
needed. Artie's writings cover the Canon system. Do you have
recommendations/settings for these two bodies that might be reliable for me to
use for cranes/snow geese and other species in flight? My other two lenses
for flight work would be the 70-200 AF-S VR and the 300 f/4 AF-S with or
without teleconverters. Any input would be most appreciated but to be honest
I feel rather guilty asking all this of you. Artie references you in his
bulletins but I don't know how you usually like to respond to such inquiries.
I consider myself to be of intermediate to advanced level but time doesn't
always allow me to spend a lot of time working out all the quirks to the AF
systems the way I would like to. If you have a chance to respond
before Thursday I would be grateful but if you are too busy I will be most
understanding and will work out the details on site at Bosque. I will be
staying at the Super 8 in Socorro and maybe I can also see if a Nikon shooter
is in his group is up for a side bar chat. I hope this e-mail finds you well
and I hope one day we may have the chance to meet.
Best regards, Dave
Here is a summary of James’ most generous and sharing response:
Autofocus: a1 Release + focus, a2 Release, a3 3D (Depends on situation, I have function button set to change AF area the fly), a4 Normal (Depends on the situation), a5 On, a6 On, a7 On, a8 AF51, a9 Off, a10 AF, b1 1/3, b2 /3, b3 1/3, e1 1/320 FP, f5 button + dials Dynamic AF Area.
Set Picture Control: Standard with these adjustments; Sharpening 3, Contrast 2 bars left (negative) of 0.
I have 3 basic AF set ups. Basic BIF set up: AF-C, a1 Release + focus, AF Dynamic, a3 3D, a4 Normal.
When fastest AF is needed: AF-C, a1 Release + focus, AF Single Sensor, AF Center Sensor, a4 Long. Remember to acquire focus or focus on another subject when using Lock-On you must take finger off shutter release and then press half way down again.
Over water or when tonality of subject is similar to background: AF-C, a1 Release + focus, AF Dynamic, a3 9 point, a4 Normal.
I recommend using the limiter switch and always prefocusing on an area close to where you expect to pick your subject up. The D300 is very good with handling noise, so I use ISO 400 even in brighter light to give more shutter speed or smaller aperture. If possible I prefer (with F4 lenses) using an aperture of F6.3-F8 for birds in flight.
I hope this helps, James
James Shadle is one of the premier photographic educators on the planet. If you come to Florida for bird photography and fail to spend at least a day or two aboard the Hooptie Deux with James you are missing the very best of what we have to offer. You can learn more about James here: http://www.wildflorida.net/ If you have a question about your Nikon gear, you can contact James via e-mail at james@birdphotographers.net or james@wildflorida.net.
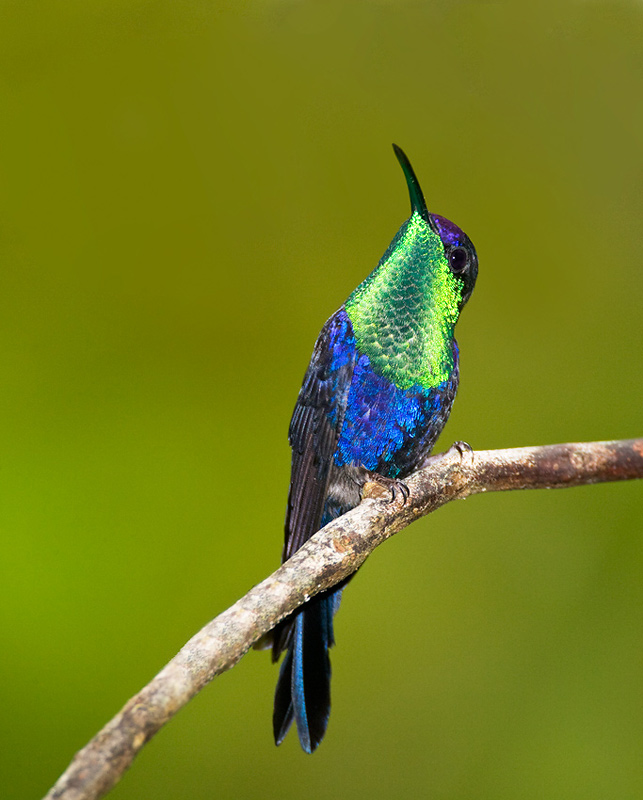
Crowned
Woodnymph male, Rancho
Image copyright 2008: Linda Robbins/Hummingbird Addiction
Canon EOS 1D Mark IIN with the Canon 500mm f/4 L IS lens and the 2X teleconverter. Gitzo 3530 LS tripod and Wimberley V2 head. ISO 400. Manual exposure. 1/100 sec. at f/8. Single flash on Wimberley f-9 Flash Bracket (http://www.birdsasart.com/accs.html#F-9%20Wimberley%20Head%20Flash%20Bracket).
One of the beauties of the Hummingbird Guide is that the techniques for creating images of perched hummingbirds are covered in detail. Note that with perfect sharpness techniques Linda is confident of making sharp images at effective 1300mm (26X magnification) at relatively slow shutter speeds. You can learn about sharpness techniques (and tons more) in ABP II (916 pages on CD only): http://www.birdsasart.com/ABPII.htm
HUNT’S PHOTO KUDOS
Via e-mail from Bob Roach:
Hi Artie, I got my Canon EOS-50D from Gary in record time. This was my first experience with Hunt's. I have never had better service anywhere. Even calls from Mr. Farber. They will be my source from now on. I see why you have them on your web site. Thanks for all of this. Bob

Green-breasted Mango, male, Rancho
Image copyright 2008: Linda Robbins/Hummingbird Addiction
Canon EOS 1D Mark IIN and a Canon 400mm f/4 IS DO lens. Gitzo 3530 LS tripod and Wimberley V2 head. ISO 400. Manual exposure. 1/250 sec. at f/25. Eight flash set-up with an artificial background.
(From the Hummingbird Guide): Once hummingbirds are coming to the feeder at your set-up you can remove the feeder and replace it with a flower held by a Wimberley Plamp http://www.birdsasart.com/accs.html#WIMBERLY%20Plamp). Use an eyedropper to carefully place sugar water into the blooms and the birds will feed directly from the flowers. The birds will usually only visit the flowers for a few minutes, and then it is necessary to re-hang the feeder for awhile. Sugar water speeds the wilting of flowers, so you need a large supply of flowers for an all day hummingbird photo session.
KUDOS ALL AROUND
An e-mail from Denis Glenon:
Dear Art, Well done in getting ABP reprinted ..... I am the proud owner of an autographed original. I refer to it all the time. And the Digital Basics Updates are worth their weight in gold. Keep up the good work. It certainly is appreciated and valued by at least one grateful photographer from Down Under. I too was stunned by the choice of the winner in the British WPOTY, but that's life!! Denis Glennon
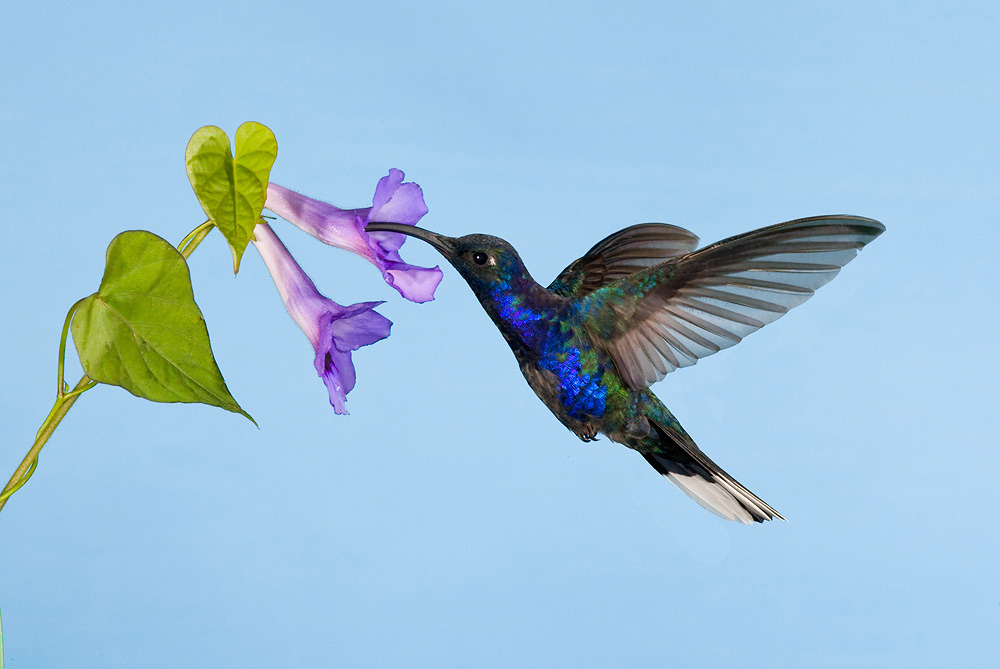
Violet
Sabrewing, male, Rancho
Image copyright 2008: Linda Robbins/Hummingbird Addiction
Canon EOS 1D Mark IIN and a Canon 400mm f/4 IS DO lens. Gitzo 3530 LS tripod and Wimberley V2 head. ISO 400. Manual exposure. 1/250 sec. at f/22. Eight flash set-up with an artificial background.
The low power settings used on the remote flashes of the set-up allow you to freeze the rapid beating of a hummingbird’s wings so that every detail of their gorgeous plumage can be appreciated.
LEPP INSTITUTE PROGRAMS
The two programs below each offer an amazing opportunity for you to grow as a nature photographer. Do consider registering immediately as there is a good chance that both courses will sell out quickly. Lastly, do considering joining me for both sessions. . To learn about the week-long program, click here: http://www.leppphoto.com/Bird_Photography_Intensive_Workshop.html To learn about the weekend program, click here: http://www.leppphoto.com/Bird_Photography_Workshop_Weekend.html To register for either or both (with a $400 discount) click here: http://www.leppphoto.com/forms/registration2009.html (You cannot register thru BAA.)
Intensive Instruction in Bird Photography/Lidi Master Series/January 12-16, 2009, 5 FULL DAYS: $2650.
Join acclaimed bird photographer, educator, and tour leader Arthur Morris for five days of intensive nature photography instruction in beautiful Morro Bay, CA. In-classroom sessions will be held at the Lepp Institute of Digital Imaging in nearby Los Osos, CA. With the group size limited to ten and a minimum of 40+ hours of instruction there will be great opportunities for you to improve both your in-the-field and Photoshop and Lightroom skills. (Note: all Lightroom instruction by Hal Schmitt.) The Monday program will consist of a full day of in-classroom instruction. Tuesday through Thursday will combine morning and possibly afternoon photography sessions with mid-day image editing and optimization sessions. Monday thru Thursday will include informal evening sessions from 7-9pm and a 90 minute midday break. There will be a morning photography session on Friday
Course outline: In-classroom/Monday: Putting Art in Your Nature Photography: Composition and Image Design, Understanding Digital Exposure via the Histogram, Understanding and Using Natural Light, Tripods, Heads, and Sharpening Tips, Lenses and How to Use Them, Better Beamer and Flash set-up Demonstration, Understanding Flash as Main Light, Flash as Fill, and Manual Flash, Getting Close; Is it Magic?, and Using Shutter Speeds Creatively, What’s the Big Deal with Depth-of-Field?
Tuesday thru Friday In-classroom: Downloading, Editing, and Optimizing your images in Lightroom 2.0 and Photoshop, Shared and Group Image Editing, Converting Your RAW Files and Recovering Detail in Over-Exposed RAW Files, Workflow Basics: Dust Spotting, Cropping, and making Shadow Highlight, Levels, Hue-Saturation, Curves, and Selective Color Adjustments, Advanced Photoshop Techniques: Expanding Canvas, 1,000 Uses for Quick Masks, Average Blur Color Balancing, Leveling the Horizon, Creating Actions, Batching, Making Selections, Why Refine Edge is Superior to Feathering, Making Adjustments to Selected Areas, Dealing with Bright Pixels, , Clone Stamp Tips and Tricks, Using the Patch Tool--It is Magic. Using the "Divide and Conquer" and "Protect and Defend" Techniques to Clean Up Distracting Background Elements, Digital Eye Doctor Techniques, Dealing with Reds and Yellows, Using PhotoMerge to create Panoramic Images, Levels Adjustment Trick for Silhouettes, and lots more. Guided Optimization of New Images.
Wednesday thru Friday: Making test prints on Canon printers and creating at least 1 professional size print (perhaps more depending on time). Thru Friday afternoon at 3:30pm.
In-the field: Seeing and Using the Light, Tripod Handling, Tips, and Techniques, Getting Close including Various Stalking Techniques, Getting the Right Exposure, Understanding In-the-Field Strategies, Evaluating a Situation, Learning to See; What Does a Pro Look for?, and AQA (all questions answered!)
Schedule/Monday (all times approximate): 9-noon/Slide Programs, Demos, and Discussion. Noon-1pm: lunch. 1pm till 2:30pm: break. 2:30-5:30 pm: Slide Programs, Demos, and Discussion.
Schedule/Tuesday-Friday (all times approximate): Dawn till mid-morning (weather permitting): In-the Field Instruction and Photography/Morro Bay. 11am: lunch. Noon till 1:30: break. 1:30 till 3:00: Photoshop sessions and image review and optimization. 3 pm till sunset: Either In-the Field Instruction/Morro Bay photo session or Photoshop/Printing sessions. Dinner: as time permits… Evening sessions (daily except Friday): after dinner till 9pm. The length of the various sessions may be changed at any time by the instructor to best meet the needs of the group
Practically Private Bird Photography Weekend/Lidi Master Series/ January 17-18, 2009, 2 FULL DAYS: $1250.
Join acclaimed bird photographer, educator, and tour leader Arthur Morris for a weekend of intense instruction in beautiful Morro Bay, CA. Morning and afternoon in-the-field sessions will be sandwiched around midday image editing and optimization sessions. The Photoshop sessions will be held at the Lepp Institute of Digital Imaging in nearby Los Osos, CA. With the group size limited to only four and a minimum of 16+ hours of instruction the opportunities for improving both your in-the-field and Photoshop skills will be virtually unlimited. There will be an informal evening session from 7-9pm on Saturday and a 90 minute midday break each day.
Course outline/Saturday and Sunday: In-the field: Seeing and Using the Light, Tripod Handling, Tips, and Techniques, Getting Close including Various Stalking Techniques, Getting the Right Exposure, Understanding In-the-Field Strategies, Evaluating a Situation, Learning to See; What Does a Pro Look for?, and AQA (all questions answered!)
In classroom midday sessions: Downloading and Editing Your Images in Lightroom 2.0 and Photoshop. (Note: all Lightroom instruction by Hal Schmitt.) Converting Your RAW Files and Recovering Detail in Over-Exposed RAW Files, Workflow Basics: Dust Spotting, Cropping, and making Shadow Highlight, Levels, Hue-Saturation, Curves, and Selective Color Adjustments, and Guided Optimization of New Images.
Schedule//Saturday and Sunday: Dawn till mid-morning (weather permitting): In-the Field Instruction and Photography/Morro Bay. 11am: lunch. Noon till 1:30: break. 1:30 till 3:00: Image review and guided optimization. 3:00 till sunset (weather permitting): either In-the Field Instruction/Morro Bay photo session or Photoshop sessions. Dinner: as time permits…Evening session (Saturday only): after dinner till 9pm. The length of the various sessions may be changed at any time by the instructor to best meet the needs of the group.
Best and love and great
picture-
artie
Note: Arthur Morris has been a Canon contract photographer since 1996
and continues in that role today. Hunt's Photo of Boston, MA is a BAA sponsor
as is Delkin
Devices. Back issues of all BAA Bulletins can be found in the Bulletin
Archives which