Arthur Morris / Birds as Art
Bulletins and Notes Archive
Click any image to enlarge it
|
Bulletins and Notes Archive
|
BIRDS AS ART ON-LINE Bulletin #85 July 27, 2002
DOWN AND DIRTY: GROUND LEVEL
TELEPHOTO PHOTOGRAPHY
THE WALT ANDERSON PANNING
GROUND-POD
CHAGRINNED... PART II
MORE ON THE ROAD RUNNER AW
DOWN AND
DIRTY: GROUND LEVEL TELEPHOTO PHOTOGRAPHY
I lay in wet sand at Stone
Harbor Point, New Jersey. Just 30 feet away, a first
winter Sanderling slept peacefully with its bill
tucked neatly into its scapulars. Crawling and
crawling and crawling to my left past other
Sanderlings, a few Dunlin, and a single Western
Sandpiper, I had worked hard to isolate a single
bird from the surf clam shells that littered the
beach. It was less than an hour before sunset; the
light was magical, and the background was pure
Atlantic blue. The resulting images were well worth
the effort, and the best of the series turned out to
be one of my very favorite photographs.
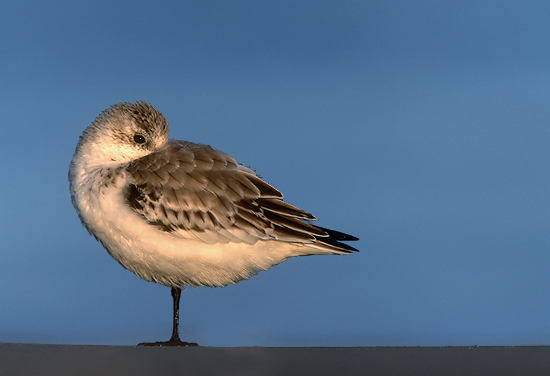
Sanderling, first
winter plumage. Image Copyright 2002 Arthur
Morris/BIRDS AS ART
Stone Harbor Point, NJ
Getting right down on the ground produces
intimate, artistic images.
Canon 600mm
f/4 L IS lens, 1.4X TC, Canon Eos 1n, Fuji Velvia
pushed one stop.
Evaluative
Metering at 0: 1/640 at f/5.6.
Why crawl around on the
beach or in the mud with a telephoto lens?
Because getting on the ground--whenever and
wherever possible--to photograph your subjects at
their eye level is a simple way to
dramatically improve the quality of your bird
photographs. When working in flat, open areas like
beaches, mud flats or grassy fields, getting down
and dirty has many advantages. Foreground and
background elements are reduced to suffused blocks
of color. Distracting elements such as brightly
colored or dark pebbles, tiny sticks, or even
feathers will either disappear completely or have
their impact on the image greatly reduced. The
resulting photographs will have an intimate and
artistic feel to them, often appearing surreal
with just a sharply focused bird sandwiched
between soft blotches of color. Additionally, by
staying low, it is far easier to get close to your
subjects without disturbing them; birds and other
wildlife are almost always threatened by the
approach of a standing human figure. For folks
whose intermediate telephoto lens is their “big
glass,” this principle is even more important.
Getting on the ground with a 300 or 400mm lens
will make it far easier to fill three quarters of
the frame with a small shorebird.
By choosing a wide aperture
(the ones designated by the smaller f/stop numbers
like f/2.8, f/4 or f/5.6), only the bird and a
narrow strip of sand, earth, or pavement on the same
plane as the subject will be in sharp focus. Your
subject will really pop. (Be sure to focus carefully
on the bird’s eye.) Images made at ground level
will almost always be far more pleasing than images
made while standing or kneeling behind your tripod.
You can prove this to yourself by making a few
images while standing at full height and then
getting right down on the ground to make photographs
of the same subject.
There are several ways to
support a telephoto lens when working on the ground.
When I first got down in the mud, I mounted my 400mm
manual focus lens in reverse on a pan tilt head that
I had removed from an inexpensive tripod, the Slik
U212. When ready to shoot, I simply shoved the long
locking handle (which was pointed at the bird) into
the mud for stability. This is still a good method
to use with 300 and 400mm lenses. Other options
include using a "groofwin" (ground-roof-window) pod
(Leonard Rue Enterprises) with your favorite ball
head, or using a sturdy tripod (without a centerpost)
with the legs splayed out completely. I do not
prefer either of these methods as my outfit would be
at least 8-10 inches off the ground and I would need
to arch my back considerably to see through the
viewfinder. In addition, it is difficult to move
closer to the birds with the cumbersome setups
described above. At Jamaica Bay Wildlife Refuge,
where crawling is all the rage at the East Pond, one
friend constructed a "mud wheelbarrow, " and another
a "mud sled.” Each of these contraptions features a
ball head affixed to a square piece of plywood. The
former has an axle and wheels attached, and the
latter is mounted on a set of tiny skis that act
like sled runners! With these homemade setups, it is
easier to crawl forward, but you still need to arch
your back quite a bit to get your eye to the
viewfinder. .
Any of the above support
platforms, however, may be ideal when you need to
elevate your rig just a bit to get over some tall
grass or gentle mounds of earth between you and the
subject. Shooting from too low a position in these
instances will result in the defocused foreground
obscuring the subject’s legs or, even worse, the
lower half of its body. For years, I simply removed
my 600mm f/4 lens from the ball head and placed the
lens on the sand, mud, earth, or pavement, supported
only by the lens foot and the (still attached) lens
mounting plate. My 600mm lens has a large enough
foot so that the camera is elevated several inches
above the ground. When working on absolutely flat
areas I usually had no problem. When I needed a bit
more elevation, I had several options: On the beach,
I would build a mound of sand to raise the camera
and lens. When working on mud or dirt, it was even
easier to build a small shooting platform. On grass
I'll often support the rig with a sweatshirt, though
a beanbag would work well there (and in other
instances as well). It never hurts to have a small
towel along with which to clean your hands before
touching your expensive camera equipment.
Currently, I use a Walt
Anderson Panning Ground-Pod that features a Lazy
Susan-type mounting clamp attached to a rustproof
supporting base. This ground-pod raises the lens
and camera only about 2-3 inches higher off the
ground, but this additional clearance allows the
photographer to rotate the lens to vertical without
having the side of the camera touch the sand, mud,
or water. The swiveling clamp makes it fairly easy
to pan with birds that are walking or foraging.
Lastly, the support base keeps most sand and mud off
of the lens. This recent addition to my equipment
arsenal has made life on the ground a lot easier.
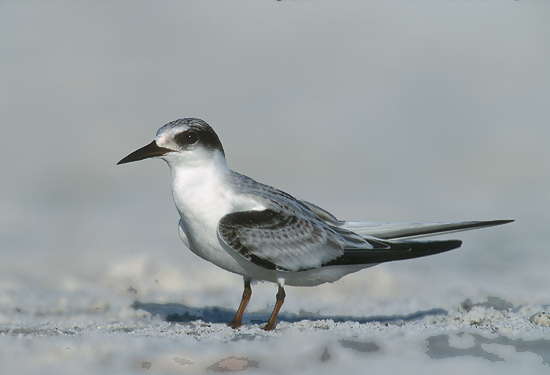
Least Tern, juvenal
plumage Image Copyright 2002 Arthur Morris/BIRDS
AS ART
I crawled more
than 200 yards through soft sand to
make this image.
Canon 600mm
f/4 L IS lens, 2XII TC, Canon Eos 1v, Fuji Velvia
pushed one stop.
Evaluative
metering at 0: 1/200 at f/11.
First, while remaining a good
distance from the birds, I search for an attractive
subject or subjects. Then, I take my big lens off
of the tripod and mount it on the ground-pod. Next,
I hang my vest atop my tripod; a Wimberley head
makes a great clothes horse. I generally mount a
tele-converter on my lens and stick an extension
tube or two, a few rolls of film, and a blower brush
in a pocket or a fanny pack. Some folks use Velcro
to attach a small kit bag to their lenses. If
you’ve remembered a small towel, simply drape it
over the lens barrel. Even with my chin on the
ground, my head will be at an angle to the
viewfinder when working at ground level, so I place
a Hama Double-Bubble level in the camera’s hot shoe
so that a quick glance will ensure that my subjects
are square to the world. (The hot shoe is the slot
on the top of the camera that accepts the electronic
flash.) How anyone can make a square-to-the-world
image without a bubble level when working on the
ground is beyond me.
I begin my approach on foot,
usually trying to reduce the distance between the
birds and myself by about half on my initial
approach. Then I’ll slowly get down on my knees and
again try to cut the distance in half. By this time
I am generally within 30 to 50 feet of the birds. I
will place my rig out in front of me and
painstakingly get down on the ground; any quick
movements at this stage are sure to flush the birds.
For my final approach, I utilize several styles of
advancing. One is to crawl directly towards the
birds like a marine while cradling the lens in my
arms. Another is to lift the lens slowly, place it
out in front of me, and then crawl forward to catch
up with it. You will be crawling on all fours,
supporting all of your weight on your knees and
elbows. Be sure to stay low and keep your butt
close to the ground (lest you scare off your
subjects). By crawling sideways like a crab, I find
that I can move along a lot more quickly. And when
you get really close to your subjects (which you
will do regularly when photographing at ground
level), simply push the lens ahead of you and then
pull yourself forward with your elbows.
It is important to keep your
hands absolutely clean and free of any sand or mud.
This will be difficult to do at first. Here are a
few tips. When you are yourself to the ground, rest
your weight on your elbows if possible. If not,
pull your long sleeves down over your hands, put
your hands on the ground for support, and then, once
you are down flat, pull the sleeves back up. Your
hands will be clean and dry. Another option is to
place a hand atop the lens barrel for support while
lowering yourself. (Be careful not to knock your
lens over into the mud!) If you are using a splayed
out tripod, you can use one of the tripod legs for
support, but make sure to place your hand on the
lowest leg section near to where it is touching the
ground, else you might damage one or more leg
sections by bending them. (I speak from experience
here…) If you do get your hands dirty, that is when
you hope that you have remembered the towel! If
your hands are dirty when you change film, you are
headed for trouble in the form of getting sand or
grit inside the film chamber. This often results in
scratched slides. I use my blower brush to clean
the inside of the camera during most roll changes
when I am working on the ground.
You will, obviously, wish to
wear old pants and a long-sleeved shirt is pretty
much imperative. A nice, soft sweatshirt offers
enough cushioning to save your elbows. Knee and
elbow pads can ease the pain when working on less
forgiving surfaces. When working in mud or on wet
sand, I sometimes wear fisherman's rain pants
(skins), but still manage to get good and messy.
When I am finished, I will back up a bit by crawling
in reverse in an effort to minimize disturbance of
the resting birds when I finally do stand up.
Almost nothing makes me happier than spending an
intimate hour with a flock of roosting shorebirds
and then crawling away and leaving them exactly as I
found them. (Carrying a small whiskbroom in your
vest allows you to brush sand or dirt from your
equipment before re-mounting the lens onto your
tripod.)
After major spinal surgery in
1990, I shied away from ground-level photography for
many years, but returned to my roots (so to speak)
about five years ago and have loved every minute of
it. Getting down and dirty is one of my very
favorite photographic techniques, and the results
make all the mud, muck, and skinned elbows and knees
well worthwhile. Whenever I encounter birds in
flat, open areas, I get right down on the ground,
approach them carefully, and begin making wonderful
images. And, if you are physically able, so should
you!
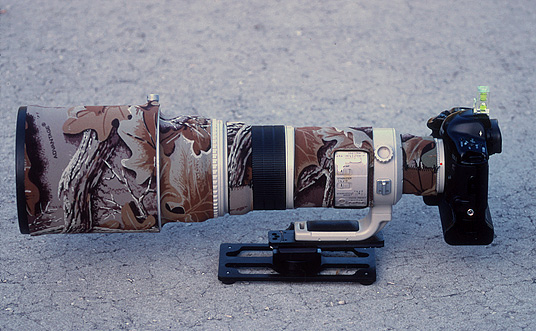
PANNING
GROUND-POD
The
Walt Anderson Panning Ground-Pod is ideal for
supporting your rig for ground level telephoto
photography. This elegantly designed ground-pod
is not for everyone, but if you regularly get down
on the ground to photograph shorebirds and gulls
at their eye-level, you will not want to be afield
without having this gadget in the big back pocket
of your X-tra Hand Vest. (The ground-pod is
reported to be ideal as well for photographing
from atop a bean bag in either your own car or an
African safari vehicle, but do note that I have
not tested the ground-pod for this purpose yet.)
Canon 500mm f/4 L IS
lens on mounted on Panning Ground Pod
Image copyright 2002
Arthur Morris/BIRDS AS ART
The
ground-pod consists of a 4X8" base plate (with 4
little rubber-nubbed "feet" at each corner) and
a small but sturdy Arca-Swiss style clamp
mounted atop lazy-Susan type base that makes
it is easier to follow running or foraging
birds. (The base itself has four cut-out
sections that reduce the weight of the unit.)
The thing that I love most about the ground-pod
is that when I turn the lens to vertical, the
height of the pod keeps the camera out of the
sand or mud. (This is a big problem when you
simply place the mounting plate and the lens
foot in the sand or mud. as I did for years)
And of course, the ground-pod keeps most of the
sand and mud off of your expensive equipment...
We currently only
six Walt Anderson Panning Ground pods in
stock. If you would like one, please send a
check for $204 to PO Box 7245, Indian Lake
Estates, FL 33855 ($199 plus $5 shipping via
priority mail). Florida residents please add
6% sales tax = $210.94. Please make
checks out to "Arthur Morris," not to "BIRDS
AS ART." Thanks!
Several readers
e-mailed and mentioned that they had had problems
with a variety camera bodies "blacking out" of when
used with a variety of IS lenses. Subscriber Dr.
Cliff Oliver of San Diego wrote;
Doctor
doctor.....
I had the same
thing happen with my 500 is blacking out and reading
"Av: 00." Canon wanted me to send it in and they
said it would take weeks to figure it out. I called
George Lepp and he said that is was obvious that the
contacts were picking up some moisture. He said
that the solution was simple: carry a pencil eraser
and "erase" the contacts periodically especially if
shooting around salt water or in humid conditions.
Presto, it was cured.
CO
It's time for me
to head to WalMart and pick up some #2 Eberhard
Fabers...
MORE ON THE ROAD RUNNER AW
I received the e-mail
below from subscriber George Forrest. (I had sent George an
earlier draft of my Road Runner AW review quite some time
ago.)
Hi Art,
As you may recall, my
decision to invest in the Road Runner AW was based on your
experience with this product. I'd like to report that it
came through three weeks of hellishly bumpy roads on my
recent Belize trip with flying colors. Pulling the Road
Runner AW through the airports, etc., was a breeze compared
to my old way of carrying the gear: 16 pounds of equipment
carried on my shoulders via two carry-on bags... With the
Road Runner AW, I got everything in one convenient
carry-on! The small four wheel drive delivered every bump
with a vengeance. At trip's end, while returning the car
to the rental agency, I opened the back door to remove the
luggage and from the top of the heap my Road Runner AW
literally jumped out, hitting the pavement with a sickening
thud. It was if someone had actually thrown it out of the
vehicle...
When we finally made it
home, the first thing that I did was mount the F5 on my
500mm Nikor and try it out; to my relief, everything worked
just fine. Thanks for steady flow of good information.
And best,
George Forrest
|
]
[
About Arthur
]
[ Photo-Tours
|
Books |
Photo Prints
]
[ Bulletin Archive
| FAQ
]
[
Accessories
|
Links ]
|