X-RATED???GOOD
NEWS
Yesterday, I was contacted by
Amphoto and informed that "The Art of Bird Photography;
The Complete Guide to Professional Field Techniques," (which, he
added rather immodestly, quickly became a classic after its
publication in 1998), will be re-released in soft cover.
A REQUEST FOR
HELP
When "The Art of..." (as we refer to it here
at ILE) was published, a very few typos and other miniscule errors
were pointed out by eagle-eyed readers. The file containing the
e-mails noting those errors was lost in our computer disaster a
few years back. Bulletin subscribers
with time on their hands are invited to get out their fine-toothed
combs and let us know if they find any typos or other errors. We
would be glad to send a complimentary 2003 Beautiful Birds
Calendar to those who find and report such errors to us. (We can,
however, reward only the first person to report an individual
error.) And be warned, they are few and far between.
Here are some examples of what we are looking for:
Page 73-a technical-minded reader noted that if the Great Blue
Heron at dawn image were indeed made with an 800mm lens, as
indicated in the caption, the sun would have had to have been much
larger in the frame. (He measured it and did the math!) This
image was made with the Canon FD 400mm
f/4.5 lens...
Page 95-Chestnut-sided Warbler: the caption states that this
image was made with flash on an EOS 1n body at a shutter speed of
1/320 sec. Problem is that the top synch speed on the 1n is 1/250
sec. The correct exposure was actually 1/250 sec. at f/6.7.
Page 100-Greater Yellowlegs-with the 600mm lens and the 2X TC
the effective focal length was 1200mm (not 120mm as indicated in
the caption). This was a typo by the publisher.
Page 126-Baltimore Oriole: same mistake as on Pg. 95...
Good luck! And thanks for
trying.
ON-LINE CRITIQUE #2
Subscriber and IPT participant John Emerson sent 10 very fine
image scans for critiquing. My comments are below, and you can
see the images here:
http://www.pbase.com/jemerson/bba_critique_services
Thank you John, for letting me share your critique, and for going
the extra mile and getting these images posted on a web site.
1: Pied Billed Grebes. This is a nicely conceived and designed
image, but there were better compositional options. Exposure and
sharpness look great. Pointing the camera up a bit would have
placed the subjects closer to the rule of thirds and resulted in a
stronger composition. The problem there is that you would be
introducing more of the actual reeds (rather than more
reflections). How do you do the latter and make the best? Point
the camera down and place the subjects in the
upper left thirds! All in all, I like this one. You did
a good job of getting them just about on the same plane…
2: Anna’s Hummingbird: nice background, subject
not-too-attractive for this species—looks as if the gorget is
molting…. And, the perch is less than ideal. Here, getting lots
closer would have been a huge plus on many counts. Brightening
this one in levels might have helped give it some pop…
3- Trumpeter Swan: This is lovely. I love the light and the drama
and the blue swirls. The exposure is very good. Ideally, the
bird’s head would be parallel to the film plane for the perfect
preening image. Lastly, pointing the camera a bit to the right
would have eliminated the “extra” space behind the bird… I would
have brought the blue streak that runs through the bird’s neck to
just inside the frame edge. You could do the same thing with a
crop from the left.
4: Clarke’s Grebe: Great light, subject, and exposure. Basic
composition is OK. You could have pointed the camera down a bit
and tried to get the whole reflection in, but going vertical would
have yielded the best composition. The problem then is getting
the right AF sensor on the bird’s eye… Perfect head-angle with
the bird looking back into the light. This is one looks fairly
sharp, but it is impossible to judge critical sharpness of scans….
5-Western Kingbird: Great subject, great light, great “other
elements of composition—the flowers, perfect exposure, and good
basic composition. A crop from the left to just before the start
of the first flower would tighten the composition up a bit. As
is, there is too much empty space to our left of the bird…. For
printing, I’d crop as indicated, and then clone out the bent
hanging wire as well.
6- adult Cooper’s Hawk. Considering it’s perch, you have made a
wonderful image. All the technicals are perfect. Again, however,
I believe that a minor change in image design could have improved
this one drastically. With the bird facing right, there is too
much space behind the bird (to our left). Pointing the camera an
inch to the right would have gotten rid of that extra space, and
also eliminated the vertical fence rail that runs right along the
lower left frame edge (and possibly allowed for the completion of
the triangle on the lower right… All of those beneficial changes
from pointing the camera one inch differently…
7- Acorn Woodpecker. Wow, this is an obvious digital capture
(as was the kite, which I forgot to mention), and that is a good
thing. The soft, soft gray background, and the low contrast
even with the blacks and whites are dead giveaways. As for the
image, it is, as the late, great Harry Chapin was known to sing
once in a while in 30,000 Pounds of Bananas, loverly. I like the
non-traditional (for a woodpecker) pose. With the sycamore
perch (and a lovely perch it is) coming diagonally out of the
corner, the composition is perfect, as is the soft light. I
would be proud to have it in my files
8-Pacific Slope Flycatcher: This is one of your better images.
It is sharp, and the exposure is perfect. I love the
background, and realize that you have intentionally placed the
bird low down in the frame to minimize the mildly distracting
stuff hanging from the branch. Other than having gotten closer,
there is nothing you could have done to improve this one. Poses
that show the whole tail, are, however, preferred.
9-Nutall’s Woodpecker. I’ll take this one; I have nothing on this
bird. I have not seen a whole lot of images of this bird… The
OOF branches in the background are mildly distracting. Sometimes,
if a bird continually returns to the same spot (is this a nest
hole???), you can tear away the BG branches if you are in a place
where it would be OK to do so. Exposure is good, sharpness again
hard to judge. I am thinking that you might be able to make this
stuff look better with Unsharp Mask…. Biggest problem here is
that the bird is angled slightly away from the film plane, and the
head even more so.
10-White-tailed Kite. Spectacular bird and spectacular pose.
Great use of the natural light, and a perfect exposure to boot.
Well done. Only nit is the perch. Put this one on a single clean
stick and it is a contest winner (which it may be anyway!) For
printing, I would clone out the (seemingly) broken Y-shaped perch
in front of the bird. If you don’t like this one, I’ll gladly
take it. Where was it made?
All in all, you are doing very well. You have exposure down pat,
make fairly sharp images, have a good eye for basic image design,
and use natural light well. You get up early (hooray!) and are
aware of both head angle and light angle.
The biggest chance to improve will include getting a bit closer to
small subjects (either physically or optically, with TCs), and
fine-tuning your compositions. Including space behind the subject
generally serves no purpose at all. I am not saying to press the
back of the bird against the frame edge, but just to keep the
space behind the bird at a minimum. Best, and thanks again for
sending these.
Artie
TURNING IMAGES INTO INCOME by JERRY
& BARBARA JIVIDEN
I receive many queries from
photographers eager to sell their work. My standard answer is to
tell them to read Chapter 10 (Evaluating and Selling Your Work) in
"The Art of Bird Photography," and to get and devour a copy of
John Shaw's "The Business of Nature Photography" ..." Last week,
while web surfing, I came across a well-written article that
contained lots of great tips for those wishing to try and generate
some income from their photograph. That article is reprinted here
with the gracious permission of Barb and Jerry.
TURNING IMAGES INTO INCOME by JERRY AND BARBARA JIVIDEN
While photography may first seem like an inexpensive hobby to
some, those of us who take it seriously know that it can soon
rival almost any other expensive item in the home. So how can you
turn those images into income rather than having your photography
drain your dollars?
Here are a few ideas to help you recover some or all of your
investment, cover your film and processing bills, and possibly
provide a lucrative income.
Join a photo group. Affiliate yourself with a photographers
group—like NANPA. Is there a camera club or professional
photography association in your area? Do you attend the annual
NANPA Summits? Collaborating with other photographers is another
productive method of improving your skills while sharpening your
business strategies.
Sell your work. Offer some of your favorite images as
photographic artwork—as prints only or matted and framed. For each
sale you make, it is probable that you can double your investment.
Local art galleries, gift shops and art fairs provide excellent
opportunities for the sale of good photographic artwork. Another
viable outlet in today's marketplace is from a personal we
Educate yourself. Before incurring time and expense in
selling your work, take a photography workshop or class, read
how-to books and magazine articles written by the pros, or sign up
for a photo correspondence course. Fill yourself with photography
information. Strive to improve your work until it is competitive
with the very best that you see published.
Enter photo
contests.
Challenge yourself to shoot better than you did the last time. The
benefits of winning contests include recognition, prestige, a
meaningful addition to your bio, and possibly prizes ranging from
cash to equipment and trips.
Build your photo
files.
Remember that
the publishing industry demands images of superior quality. As
well, you'll need an extensive file in at least a few subject
categories before aggressively marketing your work. Because the
majority of publishers prefer working from transparencies, shoot
chrome films (versus negatives) for stock. If you are building
digital files, know which markets will print from digital files
before you make a big investment. Note, however, that sending
low-res JPEG files for the initial review is becoming the growing
trend. So, consider buying a good slide scanner if you don't shoot
with a digital camera.
Know the market.
Buy and use the latest copy of Photographer's Market (Writer's
Digest Books) and/or subscribe to updated "wants lists" through a
professional stock list provider, like AG Editions. Not only do
you need to know what publishers want, you need to know when they
need it, and in what format they want to receive submissions.
Submit, submit,
submit.
After you have the quantity and quality of images, devote a
specific number of hours per week to submitting images to
potential markets. Too many photographers fail here because they
love photography but hate this type of work.
Promote
yourself.
Use your success stories to build an impressive portfolio,
including tear sheets and samples of your best work. Create a web
site to display your specialties and elaborate on your areas of
expertise and your accomplishments. If you accept assignments, be
sure that it's clearly stated and include your contact
information. For more credibility, add references and a list of
publishers who have printed your photography as you advance.
Expand.
If you already specialize in nature and wildlife photography,
consider adding other types of photography services. A good source
of income is to incorporate portrait or commercial photography as
a "division" of an existing photo business if you have one. If
you're good, and confident about it, you can supplement your
income with photo jobs of weddings, school functions, reunions,
businesses, outdoor events, and studio work—even though your
"specialty" is nature.
Give
presentations.
If you are comfortable speaking to groups, lecture about
photography. You can also include slide presentations. Do you
frequently give free advice to others just starting out? Speaking
is a good way to increase your income.
Write about it.
How
did you take that picture? What film did you use? What is the best
time of year to photograph that subject? You know, don't you? Then
propose an illustrated article about a particular type of
photography to a publisher. This could be your first photo/text
package sale. In addition to photography magazines, look for other
special-interest publications. If you enjoy mountain biking or fly
fishing, for example, propose an illustrated article on how other
readers can get great photos of their favorite pastime.
Teach
photography.
You can do it. Look at how far you've come. Find an organization
in your area that offers non-credit adult courses or programs for
kids. When you feel qualified, apply. Because you aren't providing
or reselling a "product," but rather marketing a "service,"
compensation is all profit.
We realize that not everything on
our list is suitable for everyone. But the point is this: there is
more to professional photography than just taking good pictures.
If you want a successful vocation as a photographer, if you want
to become a pro, find as many ways to incorporate photography into
your life as possible. When you do, you might just discover the
formula for turning images into income.
Jerry and Barbara Jividen
are the husband/wife team who own and operate Images Unique Nature
& Wildlife Photo Adventures, leading photo workshops throughout N.
America. Barbara is Assistant Editor of NANPA's Currents and is a
member of the Outdoor Writers Association of America. The Jividens
produce Shoot the Light Journal for the Nature
Photographers Network and write for a variety of outdoor
publications. For more information, visit their website at
www.imagesunique.com
or call (740) 774-6243.
IPT UPDATES
Bosque IPTs: NOV 18-20: 3 openings. NOV
24-26: 6 openings. NOV 30-DEC 2: 1 opening. (Jim Mahoney, if
you are reading this, please contact us; thanks). Do note that
digital photography expert Ellen Anon will be co-leading on the
first two Bosque IPTs. She is great with beginning and
intermediate photographers.
Southwest Florida IPTs: post-X-mas DEC 27-29:
2 openings. March 7-9 (or 11), 2003: 9 openings.
San Diego IPT: 4 openings
See the details at:
http://www.birdsasart.com/tours.html
Nome IPT (limit 5 photographers): A
previously unannounced IPT to Nome Alaska had been full, but John
Dupps is joining me in Tanzania instead and there is now room for
two more serious, accomplished photographers. This trip is
expensive and may feature horrific weather, but there are many
bird species in Nome that simply cannot be easily photographed
anywhere else in the world. If you are interested in joining me,
Jim Urbach, Darrell Miller, and Rocky Sharwell on this
trip-of-a-lifetime, please contact me by phone or e-mail.
SUBSCRIBER TIPS
Top pro and good friend
Brian Small offers wrote and suggested great pricing on Lithium
AA's with no shipping charges at:
http://www.batterybank.net/digital/master/aalith.html
Subscriber Cliff Slater who is
joining Todd and I in Tanzania e-mailed the following:
Those annoying little
easy-to-lose, hard-to find screw-in electrical caps for Nikon
cameras and flashes are available from the Nikon Parts
Department: (310) 516-7124. They do
take credit cards.
X-rated???
Those of you who have read this far
surely deserve a nice image as a reward.
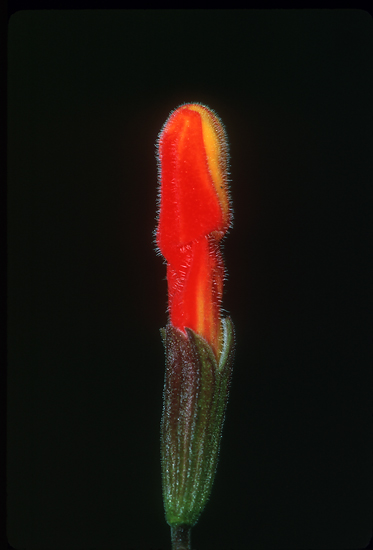
Image Copyright 2002 Arthur Morris/BIRDS AS
ART
This tiny trumpet honeysuckle bud was
photographed in a State Forest near Destin, Florida. I used the
Canon EF 180mm macro lens, two 25mm and one 12 1/2 mm extension
tubes mounted to the lens, the EF 1.4X TC behind that, and an
EOS 1v loaded with Fuji Velvia pushed one stop. Mirror lock and
10-second timer were used to make the exposure unrecorded). I
have several with a lighter (green) background (with less
ambient underexposure), but the flash as main light black
background seemed more striking to me.
Ooops, I almost forgot to
mention that I used the Canon Macro Twin light mounted on the
front of the lens. When using this incredible flash, I have
found that with the films I use and the way that my cameras are
set up, +1/3 stop on the flash is needed to properly illuminate
middle-toned subjects. And while using the Canon 1D with the
same set-up, the histograms indicated the same.