Arthur Morris / Birds as Art
Bulletins and Notes Archive
Click any image to enlarge it
|
Bulletins and Notes Archive
|
BIRDS AS ART ON-LINE Bulletin #84 July 24, 2002
EQUIPMENT REVIEW: LOWEPRO ROADRUNNER AW
CHAGRINNED...
GUSTAV VERDERBER
HISTOGRAM PRIMER
DIGITAL CAMERA IMAGE QUALITY
PSK 100 TOOL KIT
EQUIPMENT REVIEW: LOWEPRO
ROADRUNNER AW
I first met Uwe
Mummenhoff at the NANPA (North American Nature
Photography Association) Forum in Jacksonville,
Florida in January 2002. Uwe, president of Lowepro,
is a sweet bear of a man, and when I asked him if it
would be possible for him to send me a Road Runner AW
to try out, he graciously agreed to do so. I have
been using flight attendant-type rolling bags to
travel by air with super-telephoto lenses for as long
as I can remember. In most cases, I would destroy the
typical bag within a year or two, so I have been
through quite a few. The zippers on the standard,
off-the shelf rolling bad simply cannot stand up to
heavy, repeated use that I give them. And the padding
offered in these products is pretty much
non-existent.
Enter the Lowepro
Road Runner AW. This bag is designed as a rolling
backpack, but with all the straps and harness removed,
it is Lowepro’s largest legal carry-on and that is
exactly what attracted me to the product in the first
place. I never take a photo backpack into the field
with me, preferring instead to carry a tripod-mounted
super-telephoto lens on my shoulder and use my
customized X-tra Hand Vest (The Big Lens model) to
carry an assortment of lenses, accessories, film, etc.
into the field. The construction on the Road Runner
AW is heavy duty and the zippers are the sturdiest
that I have come across. The sidewalls, and the top
of the case are all well padded. The bottom seems
pretty much indestructible. Inside, you will find
Lowe-Pro’s padded, Velcroed, customizable dividers.
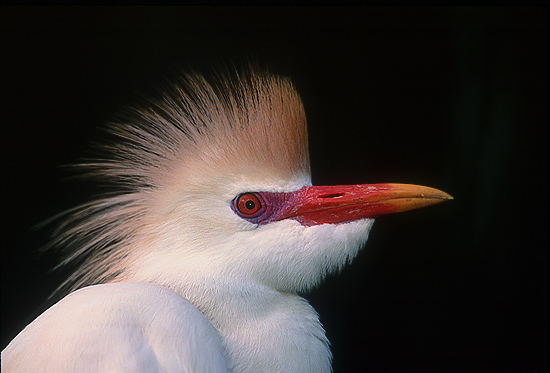
Cattle
Egret, St. Augustine Alligator Farm IPT Image
Copyright 2002 Arthur Morris/BIRDS AS ART
I rolled
everything I needed right onto the breeding swamp
boardwalk with the Road Runner AW
Canon 500mm f/4 L IS lens, 2XII
TC, Canon Eos 1v, Fuji Velvia pushed one stop. Flash
as main light with Better Beamer FX-2.
I use only a few of these dividers to section off the
big telephoto lens that I am traveling with. Lately,
this has usually been the Canon 500mm f/4 L IS lens, but
the Road Runner AW is large enough for the 600mm f/4
lenses as well. The rest of my lenses and camera bodies
are stowed in woven woolen hats, similar to the watch
caps that sailors wear in cold weather. If I need to
travel with both big lenses, the Canon 600mm f/4 L IS
lens is either packed in a checked bag wrapped in a
heavy bathrobe and additional clothing times (in a
hard-sided Delsey case), or mailed or Fed-Xed to the
location.
On my recent Churchill trip I easily packed the
following items in the Road Runner AW: the Canon 500mm
f/4 L IS lens (without the hood, which was carefully
packed in a checked bag after being stuffed with
clothing), the Canon EF 400mm f/5.6 L lens, the Canon
28-135mm IS lens, the Canon 180 macro lens, two EOS 1v
bodies, an Elan 7E body, the 1.4X and 2X II
teleconverters (stacked together), and three extension
tubes (two 25s and a 12, also stacked.) Several camera
body and other manuals, along with some pre-printed
Fed-X (and assorted mailing) labels, were placed in the
larger storage sleeve on the inside of the top cover,
while airline tickets and travel documents were placed
in the smaller (upper) one. Amazing, but true. And
with all that, there was still room for twenty or so
rolls of film had I wanted to just “fill in the open
spaces.”
The bag performed admirably, breezing through security
and fitting easily into the overhead compartments of the
all of the larger commercial jets. And when the bag
needed to be gate-checked on the Calm Air flight into
Churchill, I was not nervous at all, secure in the
knowledge that the equipment would be well protected by
the amply padded Road Runner AW (and my trusty wool
hats)! Once at the motel, I removed my big lens from
the Road Runner AW and mounted the lens hood. The 5 IS
was then placed in the Domke Long Lens bag (the old
model), where it would remain until it was time to
re-pack for the flight home. (The Domke bag had been
placed in a checked bag.) At many of the locations that
I visit, including Churchill, we work out of the trunk
of a car or out of the back of a van. When doing so, I
really loved the fact that when I opened the bag, the
(inside) cover straps were easily adjusted so that the
top of the case tilted back in place while the contents
of the case were easily accessible.
For folks who do carry their gear into the field in
large backpack, the Road Runner AW is very much a
necessity. In airports, or when photographing at
locations like the St. Augustine Alligator Farm or
Anhinga Trail in Everglades National Park, the Road
Runner AW can be wheeled smoothly along (rather than be
carried on one’s back)! I used the case in this manner
on the recent Alligator Farm Instructional Photo-Tour.
When it began to pour, I simply zippered the bag closed
and continued to photograph under my new umbrella
set-up. After the downpour, I checked and everything in
the Road Runner was bone dry. The “AW” stands for all
weather…
Because it is relatively expensive
as a roll-aboard, the decision to invest in a Road
Runner AW is a more difficult one for folks who, like
me, never strap on a backpack loaded with photography
gear. In these instances, many of the features that make
this case an excellent backpack will never be utilized.
But do know that the Road Runner AW is the largest,
finest legal-sized carry-on available today. The
Lowepro Pro Roller I, which is strictly a roll-aboard,
is large enough to take a 500mm f/4 lens, but does not
have the additional capacity that I need.
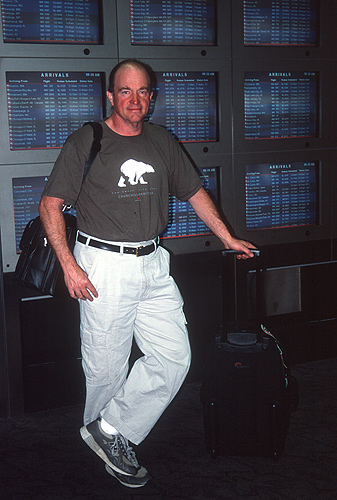
Me, with
Lowepro Road Runner AW in Minneapolis Airport
Image copyright 2002 Linda East/BIRDS AS ART
To check out the specs, or to learn
more about the Road Runner AW as a backpack, visit:
http://www.lowepro.com/pages/series/rolling/rolling.htm
CHAGRINNED
For several years, I have enjoyed carrying the 100-400 L
IS zoom lens on my shoulder as a handhold-able,
auxiliary intermediate telephoto lens. It makes an
adequate flight lens and its versatility is unmatched as
it provides an incredible range of framing options.
For quite some time, however, I have been having some
problems with the lens. Eager to capture a great close
range action image, I would grab the lens off my
shoulder and attain focus in an instant. Problem was,
many times, as soon as I depressed the shutter fully,
the LCD would black out as the camera and lens lost
electrical contact. The Av symbol would light up
reading "00." Needless to say, this became quite
frustrating as the only way to get the lens to function
was to un-mount and then re-mount the lens. After that
it would work sometimes... The problem, which happened
sporadically, seemed to occur more when I was using the
Elan 7E than one of my EOS 1vs. I ran my story by Canon
technical expert Chuck Westfall some time ago. He
mentioned that the IS system drew quite a bit of current
and that that might be the cause of the problem. I
lived with the situation for a while, but recently it
became intolerable.
I switched to the older 300mm f/4 L IS lens and really
became perturbed when the same thing happened with that
lens. Finally, I resolved to send both lenses to the
Canon repair facility in Jamesburg, New Jersey and
demand that the problem be resolved. I tested
the lenses on two different camera bodies, and each time
I tried to fire the shutter, the LCD would black out. I
don't know why I though of it, but I decided to try
fresh batteries in each body. I put four fresh lithium
double-As in the Elan 7 and a freshly charged nickel
metal hydride battery (Ni-MH Pack NP-E2) in the 1v.
After that, both lenses performed flawlessly with
each camera body as I stood there, chagrinned...
GUSTAV VERDERBER
At the recent
NECCC Photographic Conference in Amherst, MA, I had
the pleasure of attending a slide program entitled
"Sojourns in the Wild" that was presented by Gustav
Verderber. I was blown away. I have seen slide
programs by Wolfe, and Lanting, and Mangelsen;
Gustav's program, in its entirety, was as good as
any that I have seen. The photography was
excellent, especially the incredibly varied
close-ups, and the accompanying music, by noted
Celtic harpist, William Jackson, was a perfect fit.
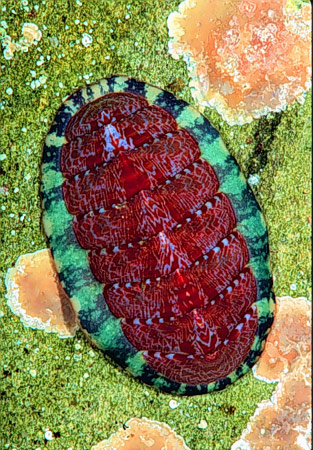
Red
Chiton Image Copyright 2002 Gustav Verderber
HISTOGRAM PRIMER
Many folks
recently have been showing up on IPTs with digital
cameras, which are fantastic teaching tools. They
offer almost immediate feedback, and, they allow
the photographer to check to see that there
exposures are right on. The problem is that I am
finding that many simply do not understand what a
good histogram should look like. You do not check
exposure by looking at the tiny image on the back
of the camera. You press "INFO" and look at the
histogram. Below--to the best of my
understanding--and thanks mostly to Canon
Technical Rep David Carlson, are the basics.
(Note, the directions, while specific to Canon
histograms, can be adapted for other brand digital
cameras and applied across the board.)
1-There should
be virtually no data in the (fifth) box on the
right, the "white" end of the graph, except for
possibly a tiny sliver in the first half of
that last box.
2-You want
the mountain for substantial amounts of whites
in the fourth box.
3-You
want the mountain for the middle-tones in the
middle of the graph, mostly in the middle box,
with some of the middle-darks in the second
box.
4-It is OK
for the very darks and the blacks to be in the
first box, but ideally, the mountain should not
touch the edge of the graph.
It's that
simple. Whites to the right (but not in the
last box), middles in the middle, and darks on
the left. If you have whites in the last box,
dial in some minus exposure compensation. If
the mountain for the black data is up against
the left edge of the graph, dial in some plus
compensation. If your middle-tones are too far
to the right, subtract some light; too far to
the left, add some light. The Pocket Guide to
Evaluative Metering, though based on film, will
also give digital photographers a good
understanding of where to begin with their
exposure compensations. The exposure guide will
be more helpful to 1D users than to users of the
D-30 or D-60 whose exposure systems are more
forgiving than the 1Ds'. For details on the
exposure guide, visit:
DIGITAL CAMERA IMAGE
QUALITY
Photographers
interested in learning the basics of digital
versus film image quality will enjoy this link:
PSK 100 TOOL KIT
The highly recommended PSK 100 tool kit can now
be ordered on-line at:
For more info on the tool kit,
see Bulletin 82 in the (up-to-date) archives at
www.birdsasart.com
|
]
[
About Arthur
]
[ Photo-Tours
|
Books |
Photo Prints
]
[ Bulletin Archive
| FAQ
]
[
Accessories
|
Links ]
|